Dig a Trench in Backyard: 7 Powerful Tips for Easy Success 2025
Planning Your Backyard Trench: The Basics
If you need to dig a trench in backyard areas, here’s a quick guide to get you started:
- Call 811 before digging to mark underground utilities (required by law)
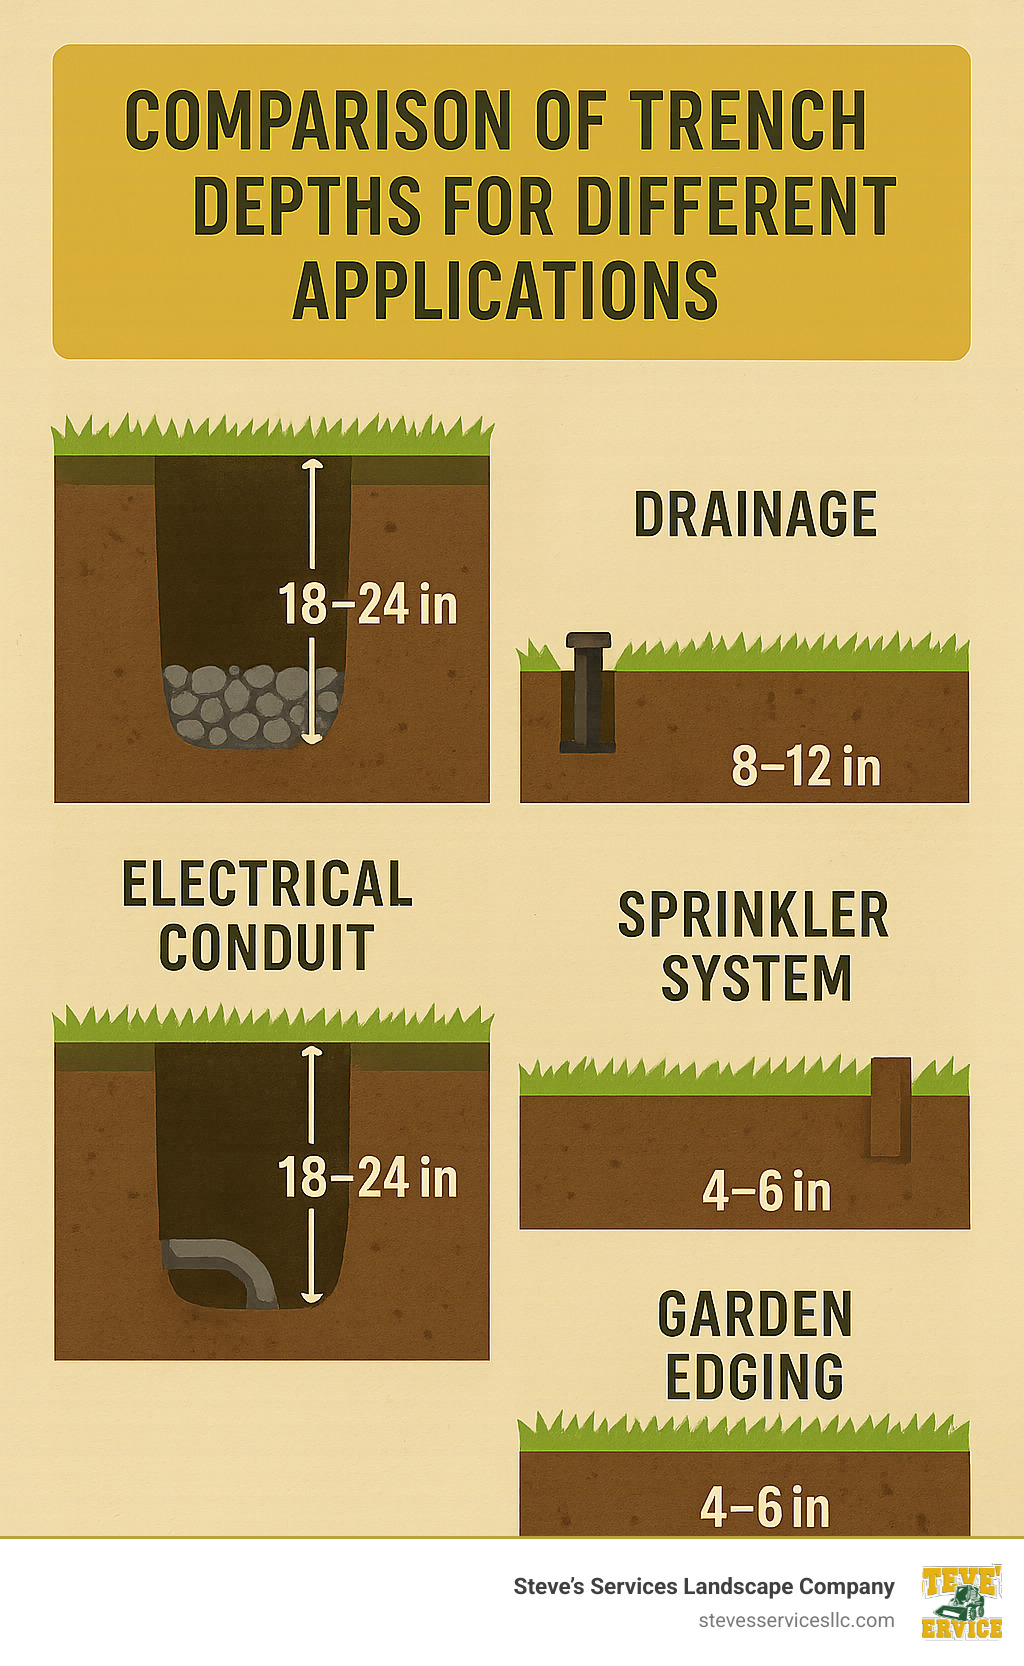
- Plan dimensions: For drainage, dig 18-24″ deep, 8-12″ wide with 1″ slope per 10 feet
- Choose tools: Trenching shovel, mattock, and drain spade for hand digging
- Consider rental: A walk-behind trencher ($70-$200/day) saves time for trenches over 20 feet
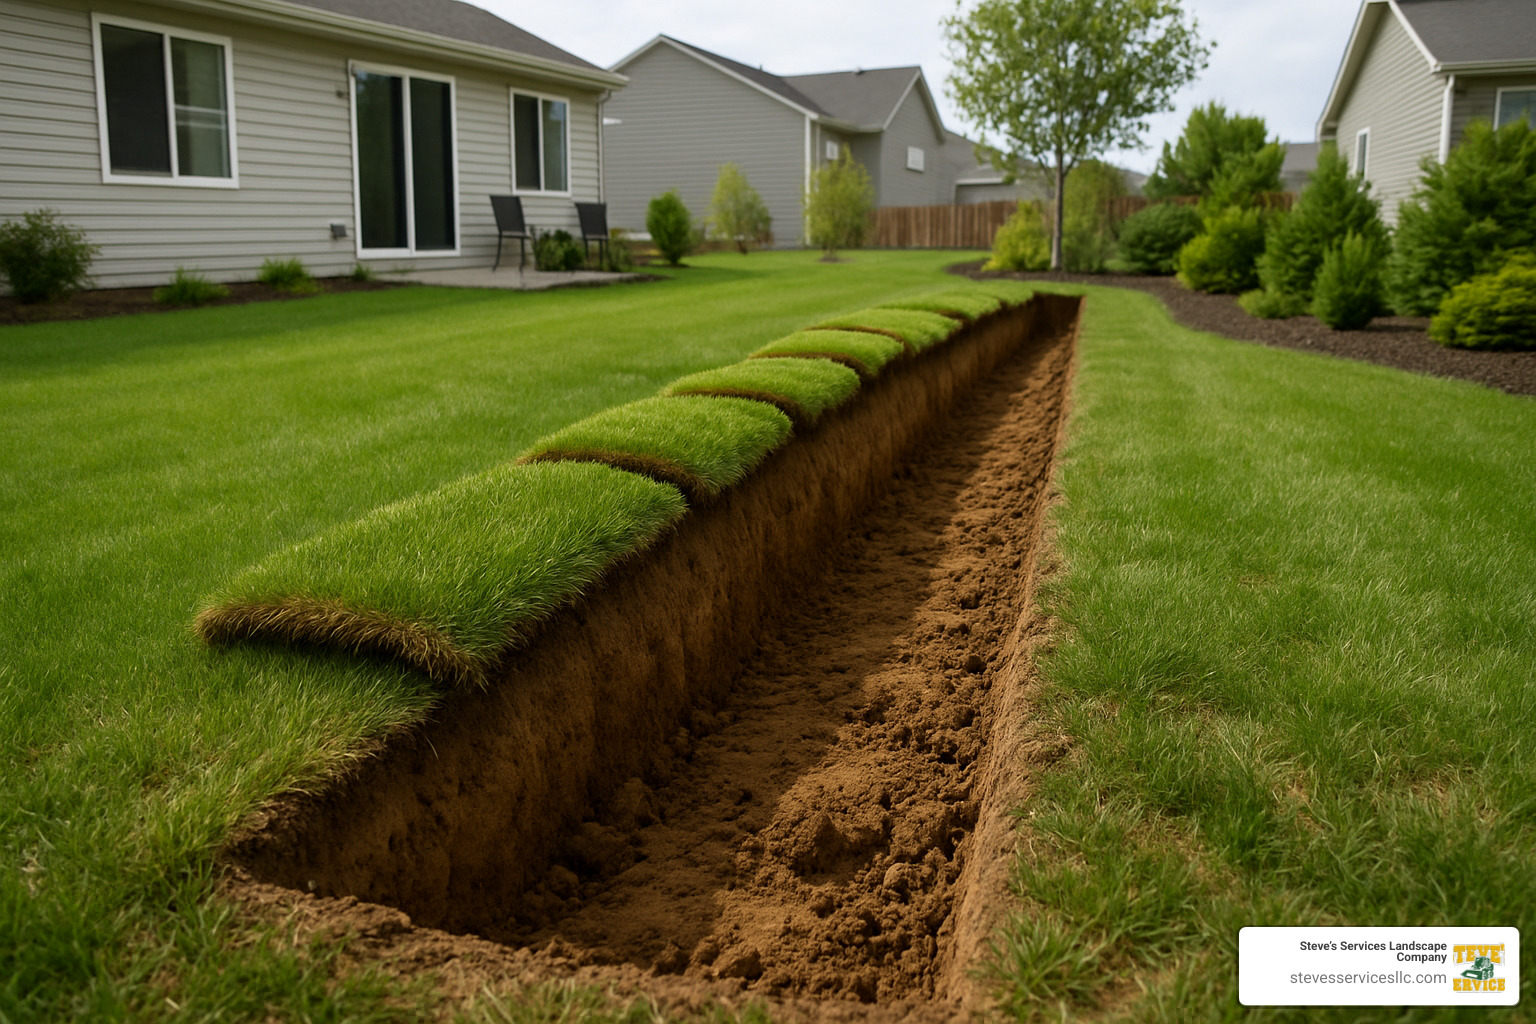
- Protect lawn: Cut and fold back sod instead of removing it for easier restoration
Why dig a trench? From solving drainage issues to installing irrigation systems or running electrical conduit, a properly dug trench is the foundation of many backyard improvement projects. But without the right approach, what should be a straightforward task can quickly turn into a weekend-long struggle.
I’ve seen countless homeowners underestimate what it takes to dig a trench in backyard settings. Many start enthusiastically with a standard shovel only to find themselves exhausted hours later with minimal progress.
With proper planning and the right techniques, you can save yourself time, prevent damage to your property, and ensure your trench serves its purpose for years to come.
I’m Steve Sylva, owner of Steve’s Services Landscape Company with over 25 years of experience helping homeowners dig a trench in backyard spaces for drainage solutions, utility installations, and landscape improvements throughout Massachusetts.

Why Dig a Backyard Trench? Projects That Require One
Before you grab a shovel and start to dig a trench in backyard spaces, it’s worth understanding exactly what you’re trying to accomplish. The right trench can solve numerous property problems, but the approach varies depending on your goal.
Here at Steve’s Services, we’ve helped countless homeowners throughout Burlington, Danvers, Everett and other Massachusetts communities transform their waterlogged yards into functional outdoor spaces.
Most common reasons to dig a trench in backyard
Poor drainage is the number one reason our customers call us about trenching. When rainwater has nowhere to go, a strategic trench can channel it away from your home and create usable outdoor space again.
French drain installation takes drainage a step further. These specialized systems use perforated pipes surrounded by gravel to collect groundwater before it becomes a problem. They’re particularly effective for preventing foundation damage.
Running electrical conduit for outdoor lighting, hot tubs, or even EV charging stations requires trenches at specific depths to meet safety codes.
Massachusetts summers can be surprisingly dry, making irrigation systems essential for maintaining healthy lawns and gardens. Underground sprinkler pipes need proper trenching to protect them from freeze-thaw cycles.
Garden bed edging trenches create clean separation between lawn and garden beds, preventing grass from invading your carefully tended flowers and shrubs.
Basement flood prevention might be the most cost-effective trenching project of all. By redirecting water away from your foundation, you can avoid basement flooding repairs that typically range from $4,000 to $10,000.
For properties on slopes, strategic trenching provides effective erosion control by managing water flow and preventing valuable topsoil from washing away during heavy rains.
Different trench types and their unique requirements
Drainage Trenches need to be relatively deep at 18-24 inches and wide enough (9-12 inches) to handle water volume during heavy rains. The most critical factor is maintaining a consistent slope of at least 1 inch drop per 10 feet away from your home.
French Drain Trenches are similar in dimensions but require a perforated pipe surrounded by gravel and wrapped in filter fabric. This system collects groundwater from a wide area and channels it away from problem spots.
Utility Trenches must comply with local building codes, which typically require electrical lines to be buried 18-24 inches deep. These trenches can be narrower (4-6 inches) but often require inspection before backfilling.
Garden Edging Trenches are the simplest type, usually just 4-6 inches deep and as wide as your edging material. These are often V-shaped with a 45° angle specifically designed to sever grass roots and create a clean division between lawn and garden beds.
Safety & Planning Essentials Before You Dig
When you dig a trench in backyard spaces, taking time for proper planning isn’t just smart—it could save your life and your wallet.
Call before you dig—non-negotiable
Calling 811 before digging isn’t just good advice—it’s the law.
When you call 811 (at least 72 hours before your project), utility companies will visit your property and mark underground lines with colored flags or spray paint. These colorful markers might seem like a minor inconvenience in your yard, but they’re actually mapping out serious hazards lurking beneath your feet.

Here in Massachusetts, we’ve seen the consequences when homeowners skip this step. One Melrose homeowner hit a gas line while installing a garden border—resulting in neighborhood evacuation and thousands in repairs. Another in Reading sliced through a fiber optic cable, cutting internet service to dozens of homes.
Remember to dig by hand within 18 inches of any marked utility lines. The service is completely free, and utility companies typically respond within 72 hours.
For more detailed information on utility location safety, visit call811.com.
How to mark and measure accurately
Once utilities are marked, it’s time to map out your trench path. Think of this as creating a roadmap for your project.
For straight trenches, use stakes and mason’s line. Drive stakes at each end of your planned trench, stretch that string tight between them, and trace along it with marking paint.
For curved trenches, a garden hose is your best friend. Lay it out in your desired shape, adjust until it looks right, then trace with marking paint.
Getting the slope right is absolutely critical for drainage trenches. Without proper slope, water just sits there instead of flowing away from your home. Aim for a minimum 1-inch drop for every 10 feet of trench length. A laser level makes this job much easier, but a string level works too for smaller projects.
Before you start, also check local permit requirements. Many Massachusetts towns require permits for trenches deeper than 3 feet or for any trench that affects drainage patterns.
For comprehensive safety guidelines, I recommend reviewing OSHA’s trench excavation fact sheet before starting your project.
How to Dig a Trench in Backyard—Dimensions, Tools & Methods
Now that you’ve planned and marked your trench, it’s time to get your hands dirty. I’ve helped countless homeowners dig a trench in backyard spaces, and I can tell you the method you choose makes all the difference!
Determining the right depth, width & slope to dig a trench in backyard
Your trench dimensions need to match your project’s purpose. For drainage trenches and French drains, you’ll want to dig 18-24 inches deep—this ensures you’re below the frost line here in Massachusetts. Make these trenches 8-12 inches wide (wider gives you better drainage capacity), with a minimum slope of 1 inch drop for every 10 feet of length.
If you’re running electrical conduit, check your local codes, but typically you’ll need 18-24 inches of depth with about 6 inches of width. Slope isn’t critical for electrical work unless water infiltration concerns you.
Sprinkler systems need to be below the frost line too, usually 8-12 inches deep with trenches 4-6 inches wide. For simple garden edging, 4-6 inches deep is usually sufficient.
If you’re in frost-prone areas like Winchester or Woburn, always dig utility trenches below the frost line (typically 36-48 inches in Massachusetts) to prevent winter damage to your pipes or conduit.
Hand-tool toolbox for small jobs
For smaller trenches under 20 feet, hand tools often make the most sense. The right tools can be game-changers—I’ve seen homeowners struggle for hours with a regular garden shovel when a proper trenching shovel would have cut their work in half!
A trenching shovel with its narrow blade is specifically designed for this work. Pair it with a drain spade (recognizable by its long, narrow blade with footrests) for getting deeper. When you hit harder soil, a grub hoe or trenching hoe helps break it up.
For the tough stuff—like roots and hard soil—a mattock combines an axe and adze in one tool, while root loppers will cleanly cut through roots up to 2 inches thick. If you’re dealing with rocky soil (common in parts of Massachusetts), a pickaxe might become your best friend.
When to rent machinery or call the pros
Sometimes, the smart move isn’t to dig by hand at all. If your trench stretches beyond 20 feet, you’re facing clay soil, or you simply need to finish before your back gives out—consider renting equipment or calling professionals.
Walk-behind trenchers typically rent for $70-$200 per day and can dig approximately 100 feet in a single day. Compare that to hand-digging a 50-foot trench, which might take you 10-20 hours of hard labor.
Professional help makes sense when precision matters, when you’re dealing with extremely rocky soil, or when large tree roots stand in your way. Based on internet averages (not Steve’s Services pricing), professional trenching typically costs $4-$15 per foot, with variables including soil type, depth requirements, and accessibility affecting the final price.
For more information about our excavation services, visit our excavation services page or learn more about backyard excavation.
Minimizing Lawn Damage, Tackling Obstacles & Proper Backfilling
When you dig a trench in backyard spaces, your lawn is going to take a hit. But with some thoughtful techniques, you can minimize that damage and have your yard looking great again in no time.
Dealing with roots, rocks, and hard soil while you dig a trench in backyard
Every yard has its challenges hidden beneath the surface. After 25 years of trenching through Massachusetts backyards, I’ve encountered everything from prehistoric-looking root systems to glacial boulders.
For those pesky tree roots, clean cuts are essential. Use loppers for smaller roots (under 2 inches) and save your back. For the bigger guys, a reciprocating saw with a pruning blade will make quick work of them. Just remember to stay at least 3-4 feet away from tree trunks when cutting roots.
Rocky soil is a common headache in New England. A sturdy pickaxe will be your best friend for loosening embedded rocks. For those stubborn boulders that refuse to budge, a rock bar gives you the leverage you need.
Hard clay soil can feel like digging through concrete, especially during dry summer months. A simple trick we use at Steve’s Services is to water the ground a day or two before digging. This softens the soil considerably and can save hours of grueling work.
Backfill, restore & clean up without scars
The way you close up your trench is just as important as how you dig it. Proper backfilling ensures your trench functions correctly and your lawn recovers quickly.
For drainage trenches, start with a layer of landscape fabric lining the bottom and sides—this prevents soil from washing into your drainage system. Add about 3-4 inches of drainage gravel as a base layer, then place your perforated pipe with the holes facing downward. Cover the pipe with more gravel, then fold the excess fabric over the top. This creates a filter barrier that keeps soil out but lets water flow in.
When backfilling utility trenches, protect your lines first with a 2-3 inch bed of sand. After laying your conduit or pipes, add another protective sand layer before backfilling. The secret to preventing settling is backfilling in thin layers—about 4 inches at a time—and compacting each layer before adding the next.
One technique we’ve perfected at Steve’s Services is what we call the “fold-back” method for preserving your lawn. Instead of completely removing the sod, we cut along both sides of the trench line with an edging tool, then undercut at a 45° angle to create sod “flaps” that we carefully fold back while digging. After the trench work is complete and backfilled, we simply fold these flaps back into place, tamp gently, and water thoroughly.
This approach can dramatically reduce lawn recovery time from months to just a few weeks—a huge difference, especially if you’re digging in spring or fall when grass is actively growing.
Costs, Maintenance & Mistakes to Avoid
Understanding the costs involved and how to maintain your trench will ensure your investment pays off for years to come.
Average trenching costs & what drives them
Based on internet averages (not Steve’s Services pricing), trenching costs vary widely:
DIY hand digging:
* $0.50-$2.50 per foot (materials only)
* Primary costs: landscape fabric, gravel, pipe
DIY with rented trencher:
* $2-$5 per foot
* Rental costs: $70-$200 per day
* Can complete 100+ feet per day
Professional trenching services:
* $4-$15 per foot (internet averages, not Steve’s Services pricing)
* Higher for rocky soil, deeper trenches, or difficult access
Cost factors that increase price:
* Rocky or clay soil (can double digging time)
* Depth requirements (each additional foot adds significant cost)
* Obstacles like tree roots or existing hardscaping
* Access limitations requiring specialized equipment
Post-installation maintenance checklist
Your trench will need occasional maintenance to continue functioning properly:
For drainage trenches:
* Inspect annually, preferably before rainy seasons
* Check for settling or collapse, especially after heavy rain
* Clear inlet grates or catch basins of debris
* Flush perforated pipes if water flow diminishes
For utility trenches:
* Monitor for settling that might expose conduit or pipes
* Check for erosion after heavy rain
* Maintain proper grading away from the house
For garden edging trenches:
* Re-cut edges annually to maintain clean lines
* Remove any grass that begins to creep across
Common pitfalls first-timers make
After years of helping homeowners in communities like Malden and Wakefield, we’ve seen these common mistakes:
- Skipping the 811 call: Always call before you dig, no exceptions
- Ignoring slope requirements: A level trench won’t drain properly
- Using the wrong tools: A standard garden shovel is inefficient for trenching
- Inadequate planning: Measure twice, dig once
- Improper backfilling: Failing to compact in layers leads to settling
- Neglecting restoration: Proper lawn repair prevents erosion
- Underestimating the work: Hand-digging is physically demanding
- Cutting corners on materials: Quality landscape fabric and gravel prevent future problems
Frequently Asked Questions about Backyard Trenching
How long does it take to hand-dig a 50 ft trench?
Hand digging a trench isn’t a quick afternoon project. For a typical 50-70 foot drainage trench, you’re looking at about 10-20 hours of solid work. That might sound daunting, but understanding what affects your timeline helps set realistic expectations.
Your digging speed depends largely on what’s beneath your feet. Clay soil will fight you every step of the way, while sandy soil moves much faster. Those New England rocks we’re so famous for in Massachusetts can turn a simple trench into an archaeological expedition! And if you’ve got mature trees nearby, those hidden roots will demand extra time and attention.
I always recommend breaking your project into manageable 2-3 hour sessions over several days. Work during cooler morning or evening hours, especially during our humid Massachusetts summers, and keep that water bottle handy.
Do I need a permit to dig a trench on my property?
“It’s my property, so I can dig wherever I want, right?” Not so fast! Permit requirements vary significantly depending on where you live and what you’re digging for.
In many Massachusetts communities where we work, like Burlington, Danvers, and Everett, drainage projects often need permits if they might affect neighboring properties or wetland areas. Our region takes water management seriously, and for good reason.
If you’re installing electrical conduit, you’ll almost certainly need electrical permits and inspections—this isn’t just bureaucracy, it’s for safety. Similarly, plumbing trenches typically require their own specialized permits and professional inspections.
The smartest approach is to check with your local building department before starting any significant trenching project. A quick call can save you from potential fines or having to undo completed work.
What slope should a French drain trench have?
Water doesn’t flow uphill (unless you’ve got a pump!), so proper slope is absolutely critical for a French drain to work. The magic number you’re aiming for is a minimum slope of 1 inch per 10 feet of trench length.
This gentle decline ensures water flows away from your home or problem area without moving so fast that it causes erosion. To get this right, a laser level or string level is worth its weight in gold—eyeballing it simply won’t cut it for proper drainage.
In particularly flat yards—which we encounter frequently in parts of Massachusetts—we sometimes recommend a slightly steeper slope of 1.5-2 inches per 10 feet. This provides extra insurance, especially in our region’s heavy clay soils that don’t drain naturally.
Conclusion & Next Steps
When it comes time to dig a trench in backyard spaces, proper planning and the right approach transforms what could be a weekend nightmare into a satisfying project. Throughout this guide, we’ve walked through everything from safety precautions to tool selection and proper restoration techniques.
The difference between a successful trenching project and a frustrating ordeal often comes down to a few key principles. Always call 811 before your shovel touches soil – this non-negotiable step protects both you and your property from potentially dangerous and expensive utility strikes. Measure and mark your dimensions carefully, ensuring the proper slope for drainage projects. Choose tools that match your project scale – sometimes a specialized trenching shovel is perfect, while larger projects might warrant renting equipment or calling professionals.
Proper backfilling isn’t just about throwing soil back in the hole. Compacting in layers and proper restoration will prevent future headaches from settling and erosion. Your future self will thank you for taking the time to do this right the first time!
At Steve’s Services Landscape Company, we’ve spent over 25 years helping Massachusetts homeowners tackle trenching projects across communities like Burlington, Danvers, Everett, and beyond. Our team understands the unique challenges of New England soil conditions – from the rocky terrain in some areas to the heavy clay in others.
Whether you’re dealing with a soggy yard that needs drainage solutions, planning to run electrical lines to a new outdoor feature, or creating garden edging to lift your landscape design, we bring the expertise and equipment necessary to complete your project efficiently and correctly.
For many homeowners, DIY trenching makes perfect sense for smaller projects. But when you’re facing extensive work, challenging soil conditions, or simply prefer to save your weekend (and your back!), our professional excavation services provide peace of mind and lasting results.
For professional trenching and excavation services throughout Massachusetts, reach out to us at Steve’s Services Landscape Company. We’re here to help ensure your backyard projects are built on a solid foundation – starting with a properly executed trench.
