Caring for new sod: 10 Essential Tips for Amazing Success 2025
The First 30 Days: Your New Sod Survival Guide
That gorgeous carpet of green you just laid down might look like an instant lawn, but beneath the surface, there’s a lot happening. Those first 30 days are make-or-break for your new turf’s future. As someone who’s helped countless Massachusetts homeowners through this crucial period, I can tell you that caring for new sod is like nurturing a newborn – it needs consistent attention, the right conditions, and a whole lot of patience.
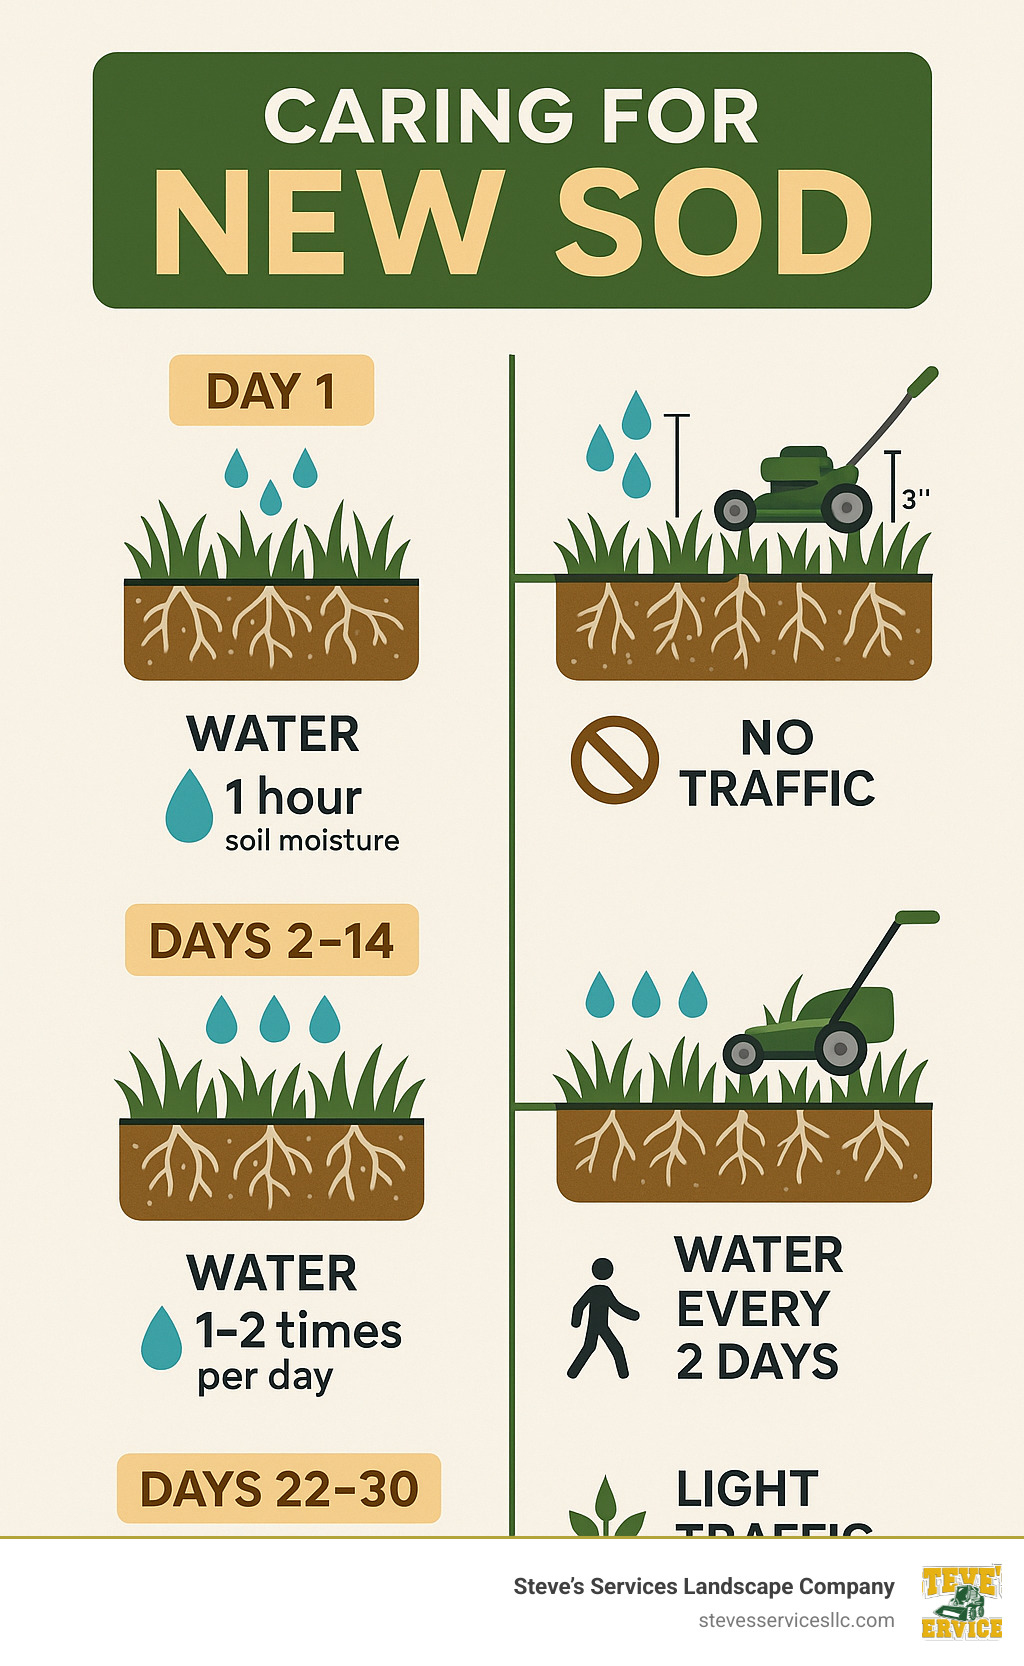
| Timeline | Watering | Activity | Care Notes |
|---|---|---|---|
| Day 1 | Soak 45-60 minutes | No traffic | Thoroughly wet soil 6″ deep |
| Days 2-14 | 3-4 times daily (15-30 min) | No traffic | Keep consistently moist |
| Days 15-21 | 1-2 times daily | First mowing at 3″ | Cut no more than 1/3 of height |
| Days 22-30 | Every other day | Light traffic | First fertilizer application |
When we install fresh sod at Steve’s Services, I always tell homeowners the same thing: “You’ve just made a significant investment, now let’s protect it.” That first deep watering is critical – I’m talking about a thorough 45-60 minute soak that penetrates all the way through the sod and moistens the soil beneath. This isn’t just a sprinkle; it’s encouraging those roots to dive down deep into their new home.
During those first two weeks, consistency is your best friend. Think of your sod as being in intensive care – it needs constant monitoring and frequent watering cycles to stay alive while it establishes. I’ve seen too many homeowners get busy and skip a watering session, only to find their beautiful new lawn stressed and struggling the next day.
I’m Steve Sylva, and after installing sod across Massachusetts for over 25 years, I’ve learned that caring for new sod requires adapting to our unique New England conditions. Our hot summers and cold winters mean your new lawn needs specialized attention that differs from generic lawn care advice you might find online.
Around the two-week mark, you’ll likely be itching to mow that lush new growth. Patience! Wait until the roots have established enough that you can’t easily lift the sod (usually 14-21 days). When you do mow, keep it high at about 3 inches, and never remove more than one-third of the blade height. Your mower blades should be razor-sharp – dull blades tear rather than cut, stressing your vulnerable new grass.
By week four, your lawn should be ready for its first meal – a starter fertilizer that encourages those roots to keep developing. This is where many DIY installations go wrong – applying fertilizer too early can burn those delicate new roots, while waiting too long can slow establishment.
That beautiful green carpet isn’t truly “your lawn” until it’s grown deep roots into your soil. The care you provide during these first 30 days isn’t just maintaining appearances – it’s building the foundation for years of lush, healthy turf that can withstand New England’s challenging seasons. For more detailed guidance on maintaining your new lawn beyond these first crucial weeks, check out our complete guide on How to Care for New Sod.
Getting the Ground Ready: Pre-Installation Essentials
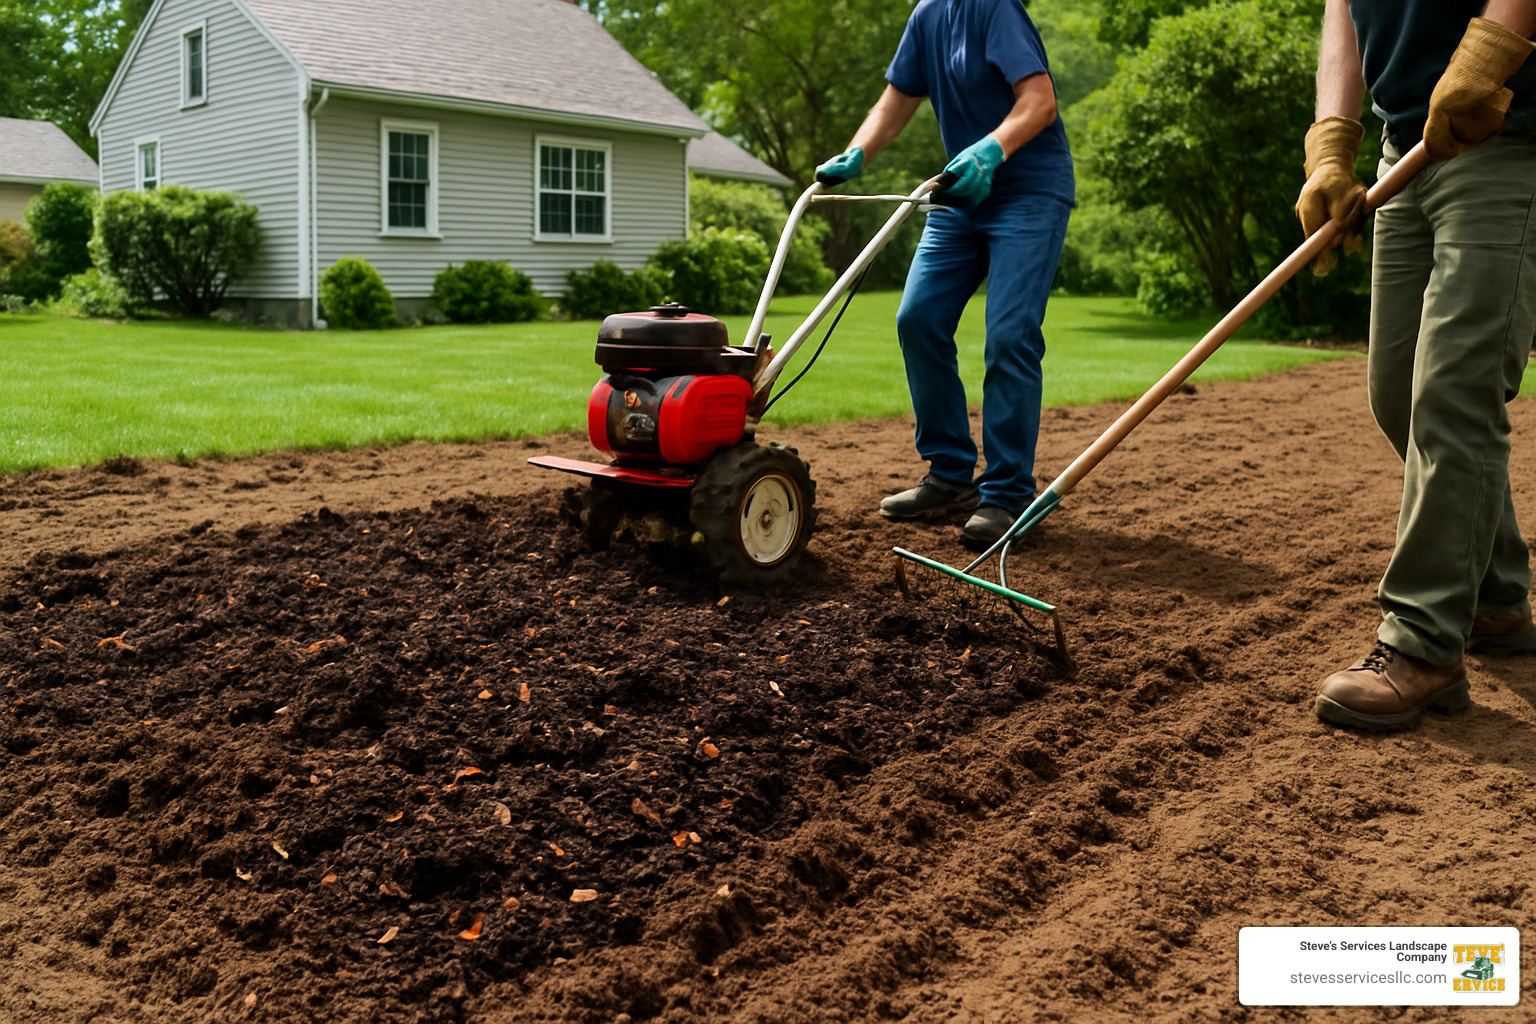
Before that perfect green carpet of sod arrives at your doorstep, we need to talk about what happens underneath. Think of soil prep like making a bed before putting on fresh sheets – it might be tempting to skip, but you’ll regret it later!
A soil test is your first best friend when caring for new sod. Most Massachusetts lawns prefer a pH between 6.0 and 7.0, and knowing where yours stands saves guesswork. Our local soils often run acidic, which is why we might recommend lime amendments to create that perfect growing environment.
Proper grading matters too – aim for a gentle 1% slope away from your home’s foundation. It’s barely noticeable to the eye but makes all the difference in preventing water from pooling where you don’t want it. A good sprinkler audit before installation also ensures your irrigation system is ready to support your new lawn’s thirsty first weeks.
Want to learn more about the nuts and bolts of installation? Check out our more info about installation guide for the complete picture.
| Soil Type | Amendments Needed | Watering After Install | Common MA Locations |
|---|---|---|---|
| Clay Soil | Compost + sand mix | 4× daily, 5 min each | Medford, Winchester |
| Sandy Loam | Compost + organic matter | 5× daily, 7 min each | Coastal areas like Revere |
Timing Your Delivery & Install
Fresh sod is like fresh fish – you want it installed within 24 hours of harvest. One summer, our Wakefield client learned this lesson when half their delivery sat in direct sun while the other half stayed shaded. The difference was dramatic!
For best results, schedule your delivery for early morning, especially during summer months. If you can’t install everything immediately, stage those pallets in shaded areas to prevent them from cooking themselves. Those tightly rolled sod pallets generate surprising heat when sitting in the sun.
Amend, Level, Roll
The perfect soil foundation comes down to three simple steps:
First, work in 2-3 inches of quality compost. For those clay-heavy Melrose and Stoneham soils, we often mix in sandy loam to improve drainage. Tilling to about 6 inches deep gives those new roots room to explore.
Next comes leveling. As Steve often tells clients, “Water doesn’t lie – it always shows you where the low spots are.” Take your time getting the grade right before sod day arrives.
Finally, don’t skip the rolling step! A lawn roller (just $20-30 to rent) eliminates air pockets that would otherwise prevent root contact with soil. As we like to say, “Good contact means good rooting.” One pass with a water-filled roller after installation presses everything into place nicely.
Pre-watering your soil the day before installation is another pro tip we swear by. Moist (not soggy) soil welcomes those new roots much better than bone-dry ground. Your new lawn will thank you for these extra preparation steps with years of lush, healthy growth.
Caring for New Sod: First 30-Day Game Plan
The first month is critical when caring for new sod. During this period, your grass is establishing its root system and adapting to its new environment. Following a structured care plan during these 30 days dramatically improves your chances of success.
Watering Schedule: Caring for New Sod Hour-by-Hour
Proper watering is the single most important factor in establishing new sod. Think of your new sod’s roots like drinking straws in a tall glass – initially, they can only reach water near the surface, but as they grow deeper, they can access moisture further down.
Day 1: The Initial Soak
Immediately after installation, water your new sod for 45-60 minutes to thoroughly soak both the sod and the soil beneath it to a depth of 6 inches. This critical first watering prevents the soil from drawing moisture away from the sod’s roots.
Days 2-14: Frequent Light Watering
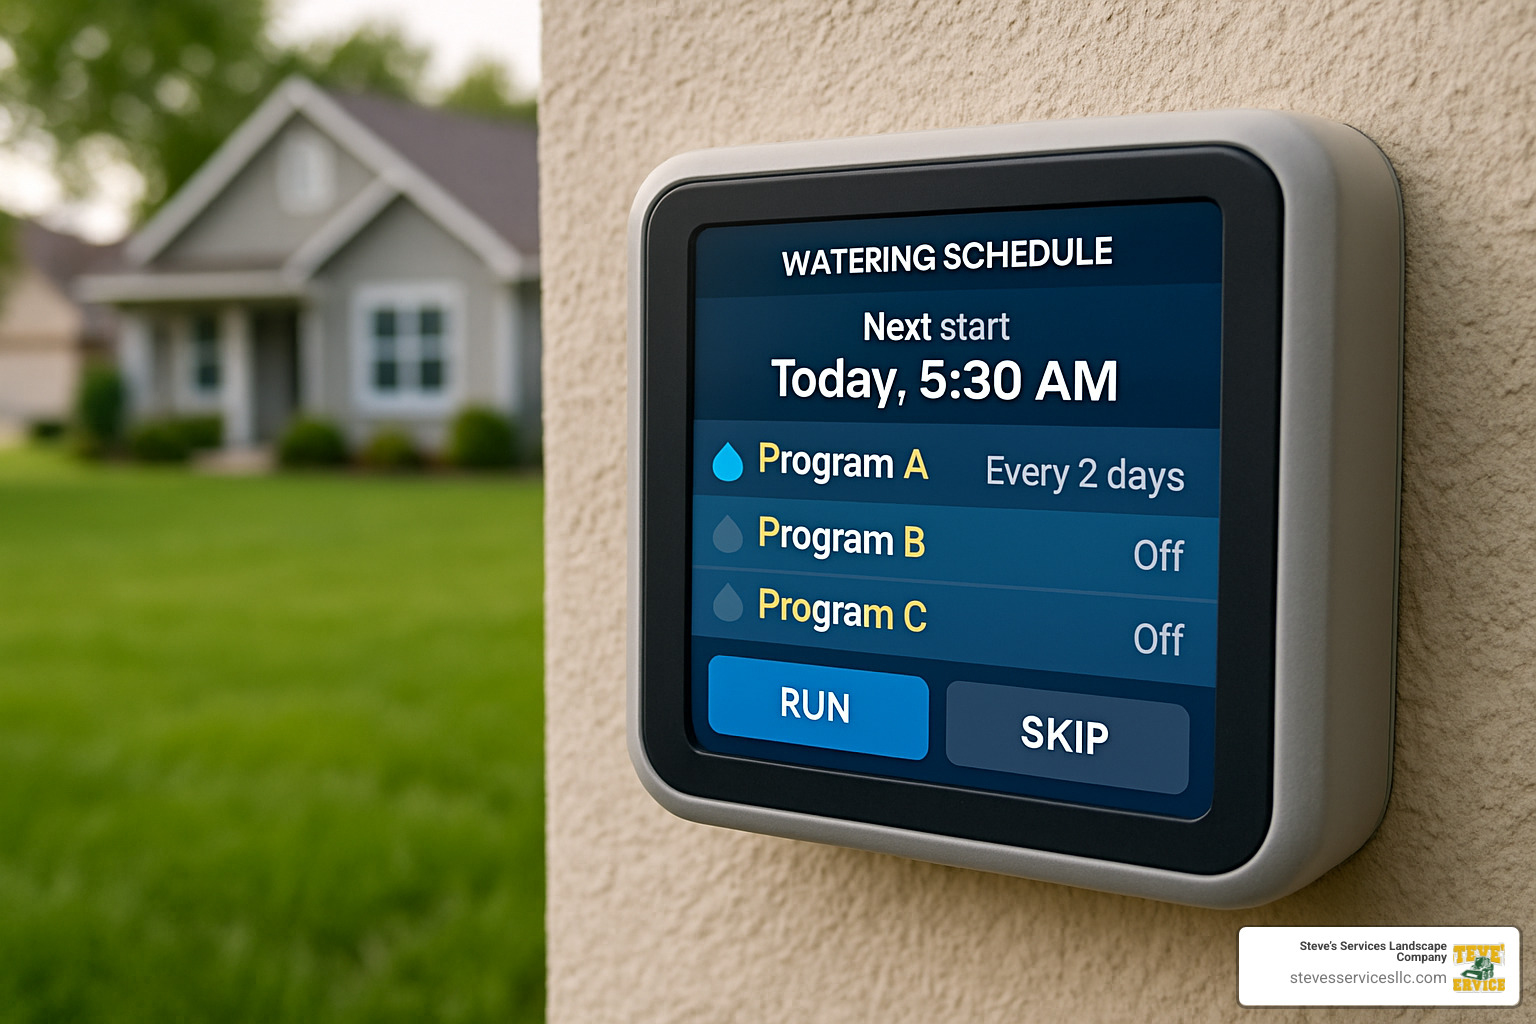
Water 3-4 times daily for approximately 15-30 minutes per zone, depending on your sprinkler type. Pop-up sprinklers typically need about 15 minutes per zone, while rotary sprinklers require closer to 30 minutes per zone.
“Water, water, water,” as one of our Lynnfield clients puts it. “Then water some more.”
The goal is to deliver 1-1.5 inches of water daily during this period, keeping the soil consistently moist but not soggy. We recommend watering during these windows: early morning (5-8 AM), late morning (10-11 AM), early afternoon (1-2 PM), and mid-afternoon on hot days (3-4 PM). Avoid evening watering (after 5:30 PM) to reduce the risk of fungal development.
The Tuna Can Test
To measure how much water your sprinklers deliver, place empty tuna cans around your lawn and time how long it takes to fill them to 1 inch. This simple test helps calibrate your watering schedule.
You’ll know your sod needs more water when you spot leaves turning bluish-gray, visible footprints remaining when walked on, corners or edges curling up, or shrinkage creating gaps between pieces.
Days 15-30: Transition Watering
After two weeks, begin reducing watering frequency while increasing duration. This encourages roots to grow deeper. For days 15-21, water once or twice daily for 30-45 minutes. Then for days 22-30, water every other day for 45-60 minutes.
For Massachusetts homeowners, adjustments based on soil type are crucial. Clay soil (common in Woburn, Winchester) needs shorter, more frequent cycles to prevent runoff, while sandy soil (common in coastal areas like Revere) requires longer, slightly less frequent cycles.
Foot Traffic & Mowing: Caring for New Sod Without Stress
One of the most common mistakes we see is premature traffic on new sod. While that green carpet looks ready for action, the roots underneath need time to establish.
Traffic Restrictions
Stay off your new sod completely for the first 2-3 weeks. This includes children, pets, and lawn equipment. If you must cross the lawn, place down plywood boards to distribute weight and minimize damage.
The Footprint Test
Around day 14, you can perform the footprint test: step lightly on the sod and then check if it springs back quickly. If footprints remain visible, the sod isn’t ready for regular traffic.
First Mowing Guidelines
Most new sod is ready for its first mowing around day 14, or when it reaches about 3-3.5 inches in height. Follow these critical guidelines for success:
Ensure mower blades are sharp to prevent tearing the grass. Never remove more than one-third of the grass blade length in a single mowing. Set mower height to 2.5-3 inches for the first cut. Avoid turns directly on the sod; make turns on hardscapes when possible. And bag clippings for the first mow to reduce disease risk.
As our operations manager notes, “ALWAYS MOW HIGH. The one-third rule isn’t just a suggestion—it’s the difference between healthy establishment and stressed, thinning turf.”
For cool-season grasses common in Massachusetts, maintaining a 3-inch mowing height throughout the first season provides the best results. Learn more about When to Mow New Sod.
Feeding Roots: Starter Fertilizer Timing & Tips
While your new sod comes with some nutrients, proper fertilization is essential for long-term health. However, timing is critical.
When to Apply Fertilizer
Wait 4-6 weeks after installation before applying any fertilizer. Applying too early can burn tender new roots and create more harm than good.
What Type of Fertilizer
For new sod in Massachusetts, we recommend a starter fertilizer with an N-P-K ratio that’s lower in nitrogen (N) and higher in phosphorus (P), such as 16-24-12. Apply at a rate of approximately 1 pound of nitrogen per 1,000 square feet, using slow-release formulations to prevent burning.
Liquid fertilizers can be gentler on new lawns, but properly applied granular fertilizers are also effective. The key is even distribution and proper watering afterward.
One North Reading client shared, “I was eager to fertilize my new lawn right away, thinking it needed the boost. Steve’s team explained that waiting until the six-week mark allowed the roots to establish first, resulting in much better nutrient uptake.”
By following this 30-day game plan, you’ll set your new sod up for success. The most important things to remember are consistent watering, patience with traffic restrictions, proper mowing height, and timely fertilization. For more detailed guidance, check out our complete guide on How to Care for New Sod or learn specifically about Fertilizer for New Sod.
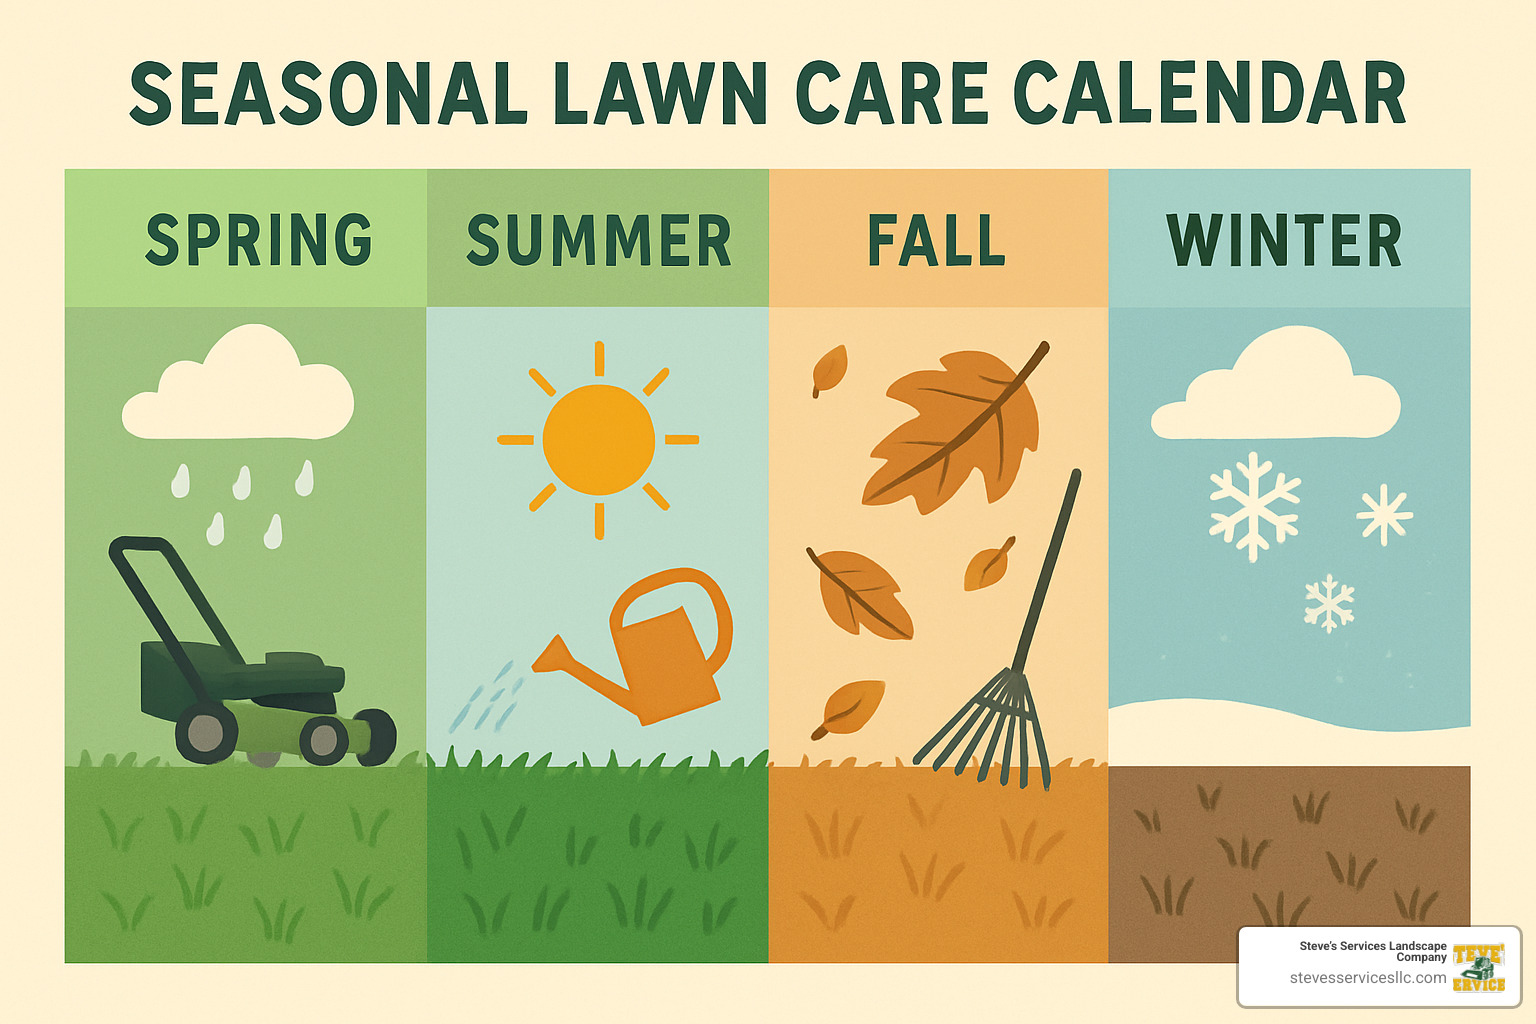
Seasonal & Climate Tweaks for Sod Success
Massachusetts presents unique challenges for caring for new sod due to our distinct seasons and variable climate conditions. Adjusting your care routine based on seasonal factors significantly improves establishment success.
Cool-Season vs Warm-Season Grasses
In Massachusetts, we primarily work with cool-season grasses, which thrive in our climate. Our customers love Kentucky Bluegrass for its beautiful dark green color and excellent cold tolerance, though it does take a bit longer to establish—typically 14-21 days for initial rooting. We recommend maintaining it at a mowing height of 2.5-3.5 inches for best results.
Tall Fescue is another popular choice, especially for busy families. It establishes faster (usually within 10-14 days) and handles foot traffic like a champ. Its superior drought tolerance makes it more forgiving during those occasional dry spells we get in New England. For Tall Fescue, we suggest keeping your mower set higher at 3-4 inches.
While warm-season grasses like Bermuda and Zoysia are uncommon sights around here, they occasionally make appearances in specialized applications. These southern favorites establish roots more quickly in warm weather but require lower mowing heights of just 1-2 inches. The downside? They’ll go dormant (turning brown) during our cold months and can look “dead” to the untrained eye from late fall through early spring.
Irrigation Adjustments by Season
Spring installations (April-May) benefit from naturally cooler morning temperatures and helpful rainfall. However, our famous New England spring winds can increase evaporation significantly. I always tell clients to install rain sensors during spring projects and check soil moisture daily with a simple screwdriver test—if it slides easily into the soil about 6 inches, you’re in good shape.
Summer installations (June-August) are trickier but still doable with proper care. The heat and evaporation demand higher water requirements, and you might face drought restrictions in some towns. One trick we’ve found helpful is adding an extra watering cycle during extreme heat (anything above 90°F) and breaking up watering into shorter bursts to prevent runoff. As I tell my Melrose clients, “Water that runs down the street doesn’t help your lawn!”
Fall installations (September-October) represent our ideal planting window in Massachusetts. The cooler temperatures reduce evaporation, giving your new sod the perfect conditions to establish before winter. You can typically reduce watering frequency while still maintaining adequate moisture. Many of our Winchester and Stoneham clients are surprised by how much less water their fall installations need compared to summer ones.
Winter brings its own considerations, especially for fall-installed sod. I learned this lesson years ago from a customer in Malden who ignored our advice about occasional winter watering. “Our October-installed sod looked perfect going into winter,” she told me later, “but by spring, we had significant spider mite damage that took months to recover from.”
During those warm, dry winter days (yes, we get them!), applying light waterings can prevent devastating spider mite damage. It’s also crucial to monitor your lawn during freeze-thaw cycles, as these can create stress on newly established grass.
For scientific backing on proper lawn watering techniques across seasons, the University of California’s Agricultural and Natural Resources department has published excellent research on the subject. Their findings align with what we’ve observed in our Massachusetts installations over the past 25 years. Scientific research on lawn watering
Caring for new sod isn’t a one-size-fits-all approach. The season you install in will significantly impact how you care for your new lawn, but with these adjustments, you can achieve success year-round.
Troubleshooting: Browning, Fungus & Other Early Woes
Even with your best efforts at caring for new sod, unexpected challenges can pop up during those critical first weeks. Don’t worry – most issues can be resolved quickly if you catch them early!
Too Much vs Too Little Water
Finding that perfect moisture balance can be tricky. As one of our Medford clients laughed, “I thought I was being helpful by watering extra on hot days, until my lawn started growing mushrooms instead of grass!”
Signs of Overwatering:
That “more is better” approach can actually suffocate your new lawn. Watch for soggy, spongy soil that stays wet for hours after watering, mushrooms appearing out of nowhere, algae or moss development, a foul musty odor from the soil, or grass blades turning yellow instead of green.
One simple check I teach all our customers is the “sponge test” – if you step on your lawn and water squishes up around your shoes, you’re definitely overwatering.
Signs of Underwatering:
On the flip side, thirsty sod will tell you it needs a drink when you see corners of sod pieces curling up, gaps forming between sections, a blue-gray color instead of vibrant green, or dry soil beneath the sod when you peek underneath. Your lawn will also recover slowly after being walked on, with footprints remaining visible.
The Screwdriver Test
Here’s a quick trick we use on all our installations: push a screwdriver into the soil. If it slides easily to a depth of 6 inches, your moisture level is good. If you hit resistance, your soil needs more water. This simple test has saved countless lawns across Massachusetts!
Disease & Pest Watch
New sod can be vulnerable during establishment, especially in our humid New England summers.
Fungal Diseases
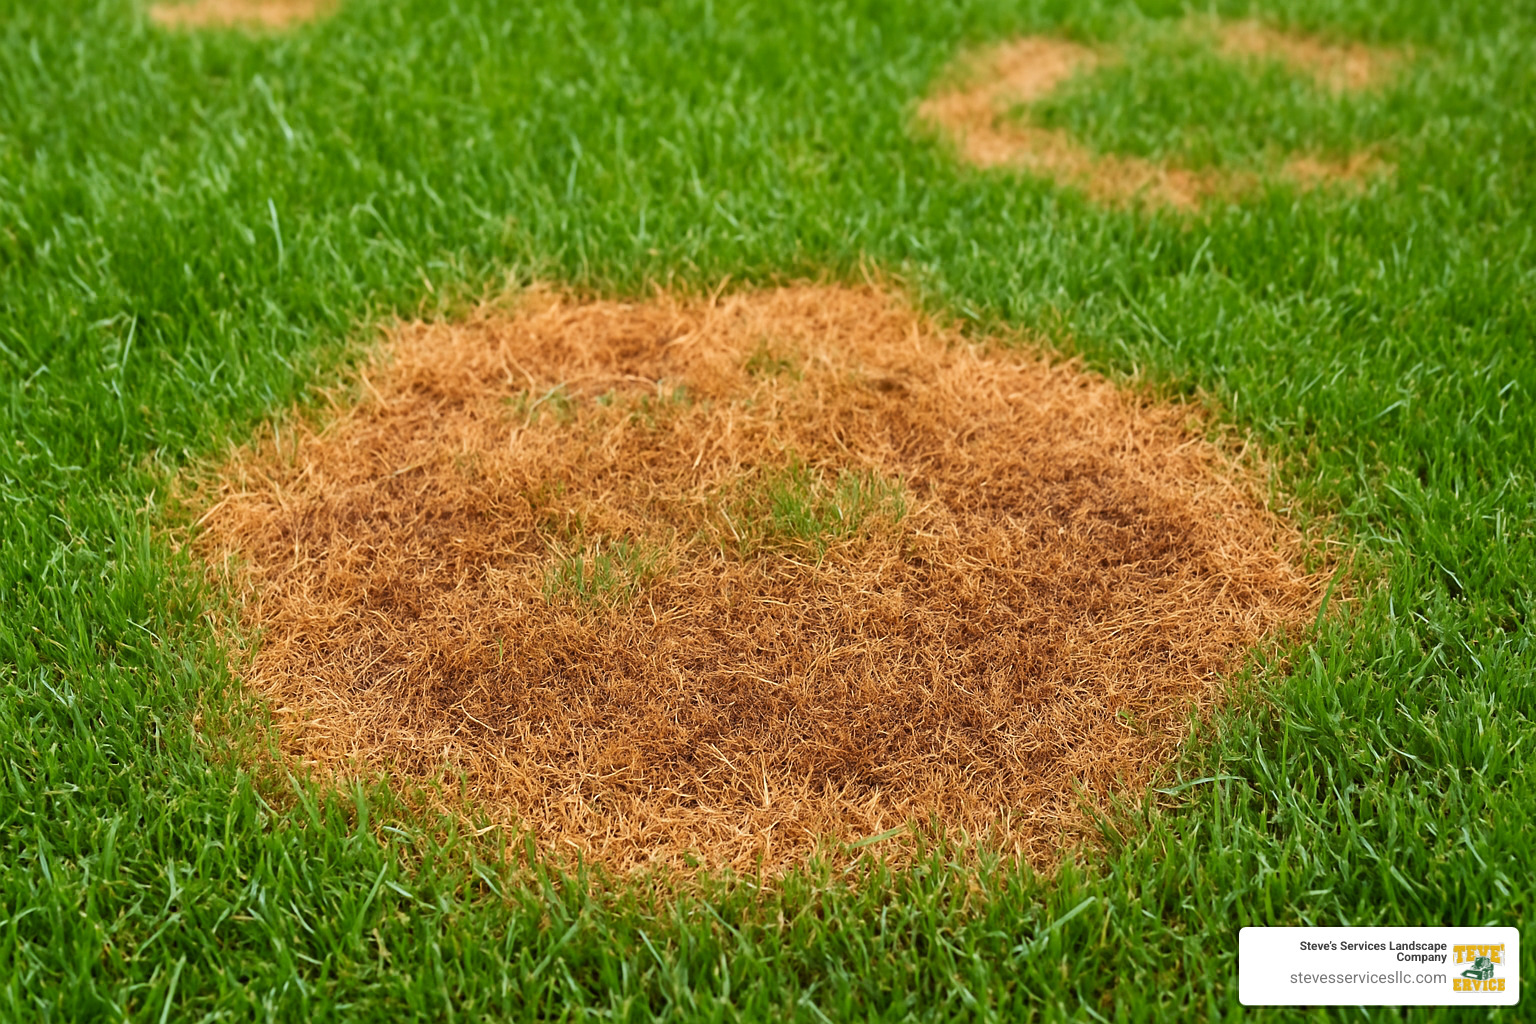
Brown patch is the most common issue we see – circular brown areas ranging from 6 inches to several feet in diameter. Dollar spot creates small, silver-dollar-sized patches of tan grass, while pythium causes a greasy, water-soaked appearance, typically in low spots with poor drainage.
The best defense is good cultural practices: water early in the day so grass dries before evening, avoid excessive nitrogen during establishment, and ensure proper drainage. If problems persist, apply fungicide only after professional consultation.
As our Melrose client finded last summer, “Changing my watering schedule to early morning instead of evening made my fungus issues disappear without any chemicals.”
Pest Problems
Sod webworms create irregular brown patches with chewed leaf blades, while grub damage shows up as patches that can be pulled up easily, revealing white C-shaped larvae underneath. Chinch bugs cause a patchy, drought-stressed appearance even with adequate water.
For a quick pest check, try our soapy water test: mix 2 tablespoons of dish soap with 2 gallons of water and pour over a 2×2 foot area. If pests are present, they’ll surface within minutes, allowing you to identify the culprit.
Weed & Chemical Cautions
While it’s tempting to reach for weed killer at the first sign of unwanted plants, patience is key when caring for new sod.
Your weed management timeline should follow this sequence:
1. First 4 weeks: Hand-pull weeds only
2. After 4 mowings: Safe to apply selective post-emergent herbicides
3. After 12 weeks: Pre-emergent herbicides can be applied if needed
Our turf specialist, Mike, always reminds customers, “That dandelion isn’t going to destroy your new lawn, but premature herbicide application might set you back weeks. Give your grass time to establish strong roots before introducing chemicals.”
For Massachusetts homeowners battling crabgrass, we recommend hand-pulling isolated patches, maintaining a proper mowing height (3+ inches) to shade out seedlings, and waiting until fall for pre-emergent application once the lawn is fully established.
A few weeds during establishment is normal – even the most pristine sod can have dormant weed seeds in the soil beneath. Focus on getting your grass healthy first, and many weed problems will resolve themselves as your thick lawn naturally outcompetes the invaders.
If you’re seeing persistent issues with your new sod, our team at Steve’s Services can provide a quick lawn assessment to identify problems early, before they become expensive to fix. A healthy lawn is our passion, and we’re always just a phone call away!
Frequently Asked Questions about Caring for New Sod
How long before I can walk or play on my new lawn?
The question of when you can finally enjoy your new green space is one we hear almost daily. Generally, light foot traffic can begin after 2-3 weeks, or after you’ve completed your first mowing. Your lawn needs this initial period to establish roots that can withstand the pressure of footsteps without damage.
For more intensive activities like family football games, setting up patio furniture, or letting the dog run free, you’ll want to wait until the 4-6 week mark. A simple test we teach our clients: if you can easily lift a corner of the sod with minimal resistance, it’s telling you “I’m not ready yet!”
Many of our clients in busy family neighborhoods like Reading and Wakefield find it helpful to create temporary pathways during this establishment period. Something as simple as stepping stones between your driveway and front door can protect those high-traffic areas while roots develop.
As we often remind homeowners, “Treat your lawn like the sod was just installed” for the entire first season. Even after that initial rooting period, your new lawn will benefit from gentler treatment as it continues to strengthen its root system.
Is it possible to overwater new sod, and what are the signs?
Yes! Overwatering is actually one of the most common mistakes we see, especially in areas with clay-heavy soils like parts of Medford and Winchester. While new sod needs consistent moisture, too much water can be just as harmful as too little.
Look for these telltale signs that you might be overdoing it:
– Water standing under the sod for more than a few minutes after watering
– A spongy, soggy feeling when walking across the lawn
– Yellowing of grass blades (which many mistakenly attribute to needing more water)
– Mushrooms or fungal growth appearing
– Algae developing on the soil surface
We teach our clients a simple check: after watering, wait about five minutes, then gently lift a corner of sod. The soil underneath should feel moist but not soggy. If water is pooling or the soil feels like a wet sponge, you’re likely overwatering.
One of our Stoneham clients shared a common experience: “I thought more water was always better until mushrooms started appearing throughout my new lawn. After adjusting to shorter, more frequent watering cycles, the problem cleared up within a week.”
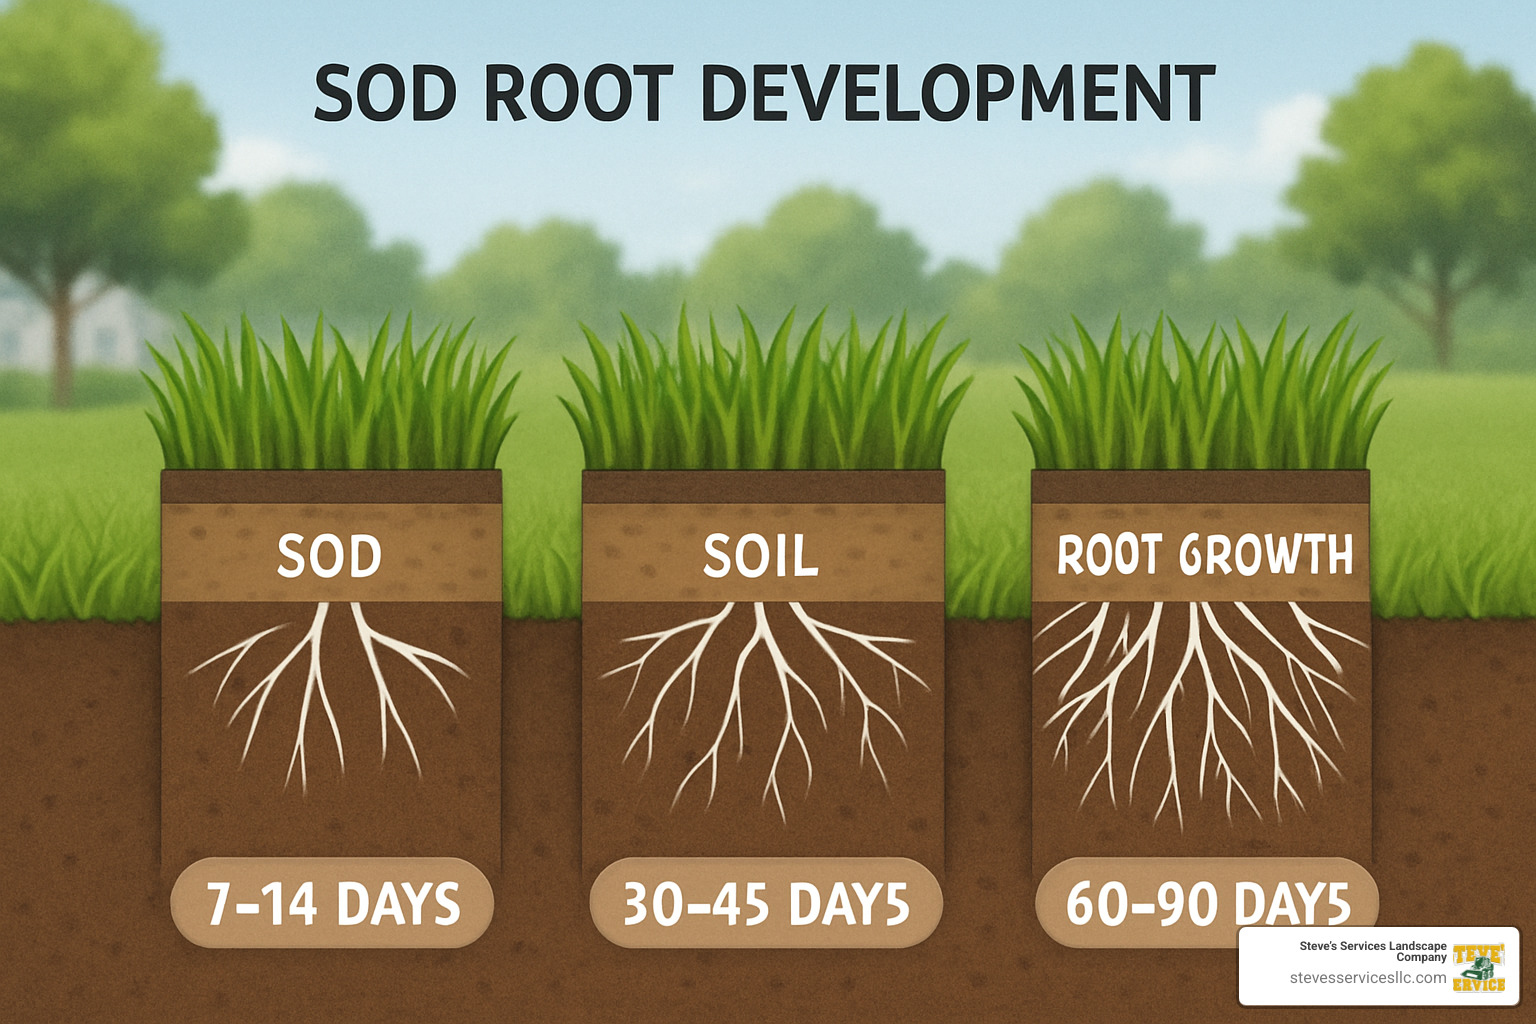
How long does it take for new sod to fully root?
Caring for new sod means understanding that root establishment happens in phases, not overnight:
During the Initial Rooting phase (7-14 days), your sod begins sending small, tender roots into the soil beneath. At this stage, you can still lift pieces relatively easily, but you’ll feel some resistance as those young roots hold on.
The Established Rooting phase (30-45 days) is when deeper roots develop and the sod becomes firmly anchored. By this point, you’ll have difficulty lifting a piece without breaking it – a good sign that your lawn is settling in nicely.
Complete Establishment (60-90 days) is the final phase when the root system fully develops, typically reaching 4-6 inches deep. Now your lawn has become drought-tolerant and ready for normal maintenance routines.
Several factors affect how quickly your sod will root in Massachusetts:
– Season of installation (spring and fall installations typically root faster due to ideal temperatures)
– Soil temperature (the sweet spot is 50-65°F)
– Quality of soil contact (proper rolling during installation eliminates air pockets)
– Consistent moisture (maintaining the right balance)
– Grass variety (Kentucky bluegrass typically takes longer to establish than tall fescue)
Conclusion & Next Steps
Caring for new sod isn’t just a short-term project—it’s an investment in your property’s future. Following the guidelines we’ve shared throughout this article will help you establish a lawn that improves your home’s beauty and value for years to come.
Those first 30 days may feel intense (and sometimes stressful!), but I promise the effort is worth it. As your new lawn transitions from “fresh transplant” to “established resident,” you’ll gradually adjust your care routine to match its changing needs.
Think of it as raising a child—the newborn stage requires constant attention, but as they grow, they become more independent. Your lawn follows a similar path:
- Watering shifts from frequent light sprinklings to less frequent, deeper soakings
- Fertilization settles into a regular seasonal schedule custom to our Massachusetts climate
- Mowing heights can be adjusted based on seasonal needs and grass type
- Full weed control programs can be safely implemented once roots are strong
The pride you’ll feel when you look out at your lush, healthy lawn makes all the early work worthwhile. There’s something deeply satisfying about walking barefoot across grass you’ve nurtured from day one.
At Steve’s Services, we understand the unique challenges Massachusetts homeowners face when establishing new lawns. Our team has helped countless properties throughout Burlington, Danvers, Everett, Lynnfield, Medford, Melrose, North Reading, Reading, Revere, Saugus, Stoneham, Winchester, Woburn, Malden, and Wakefield transform from bare dirt to showcase lawns.
I still remember a Winchester client who called us in a panic about brown patches in her new sod. After a quick visit, we identified a simple irrigation adjustment that saved her lawn. Three years later, she still sends us photos of her gorgeous green space that’s become the neighborhood gathering spot.
Whether you’re looking for professional sod installation or guidance on maintaining your new lawn, we’re here to help. Our comprehensive approach ensures your lawn receives exactly what it needs to thrive in our challenging New England climate.
For professional assistance with your lawn care needs, contact Steve’s Services today. We’ll help you create a lawn that doesn’t just survive—it thrives.