Gardena Micro Drip Winter: 7 Powerful Tips for Ultimate Protection 2025
Protecting Your Garden’s Lifeline: Winter-Ready Micro-Drip
Gardena micro drip winter preparation is essential for preventing costly system damage and ensuring your irrigation setup survives the cold months intact. Here’s what you need to know:
| Winterizing Your Gardena Micro-Drip System | Why It Matters |
|---|---|
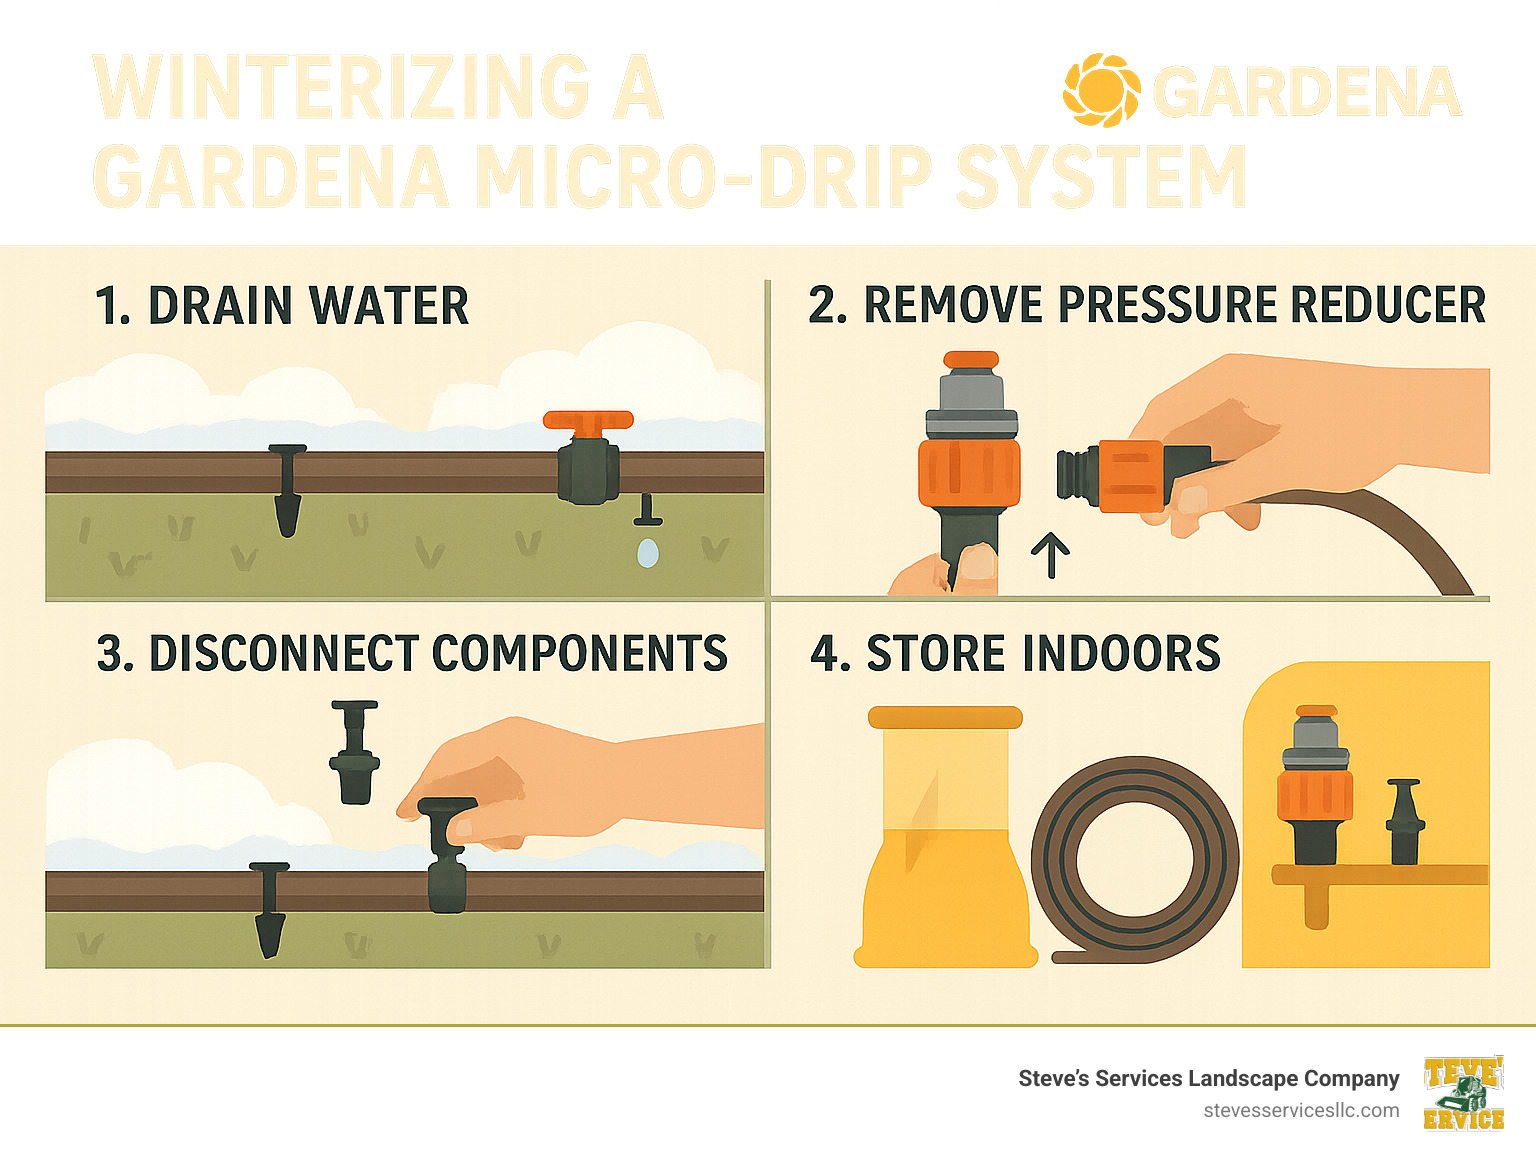
| 1. Drain all water from the system | Prevents pipes and components from cracking due to ice expansion |
| 2. Remove and store the pressure reducer indoors | Protects the most vulnerable component from freeze damage |
| 3. Disconnect and store above-ground components | Extends the lifespan of your investment |
| 4. Insulate any parts that must remain outdoors | Creates a barrier against extreme temperatures |
| 5. Leave solenoid valves open | Allows for proper drainage and prevents internal damage |
As temperatures drop across Massachusetts, your Gardena Micro-Drip System needs special attention to survive until spring. While this innovative system excels at delivering water directly to your plants’ roots with up to 70% water savings during the growing season, winter’s freezing temperatures pose a serious threat to its components.
Properly winterizing your irrigation system isn’t just good practice—it’s essential protection for an investment that keeps your landscape thriving. Water expands when it freezes, potentially causing cracked pipes, split valves, and damaged emitters that can lead to costly repairs when spring arrives.
The good news? With some simple preventative steps, you can shield your Gardena system from winter’s worst and ensure it’s ready to perform perfectly when gardening season returns.
My name is Steve Sylva, and with over 25 years of experience maintaining irrigation systems including Gardena micro drip winter preparations for countless Massachusetts properties, I’ve seen how proper winterization prevents expensive spring headaches for homeowners and businesses alike.
Gardena micro drip winter vocabulary:
– drip pipes in winter
– frozen irrigation system
– cost to repair frozen sprinkler system
How the Gardena Micro-Drip-System Works Year-Round — Basics First
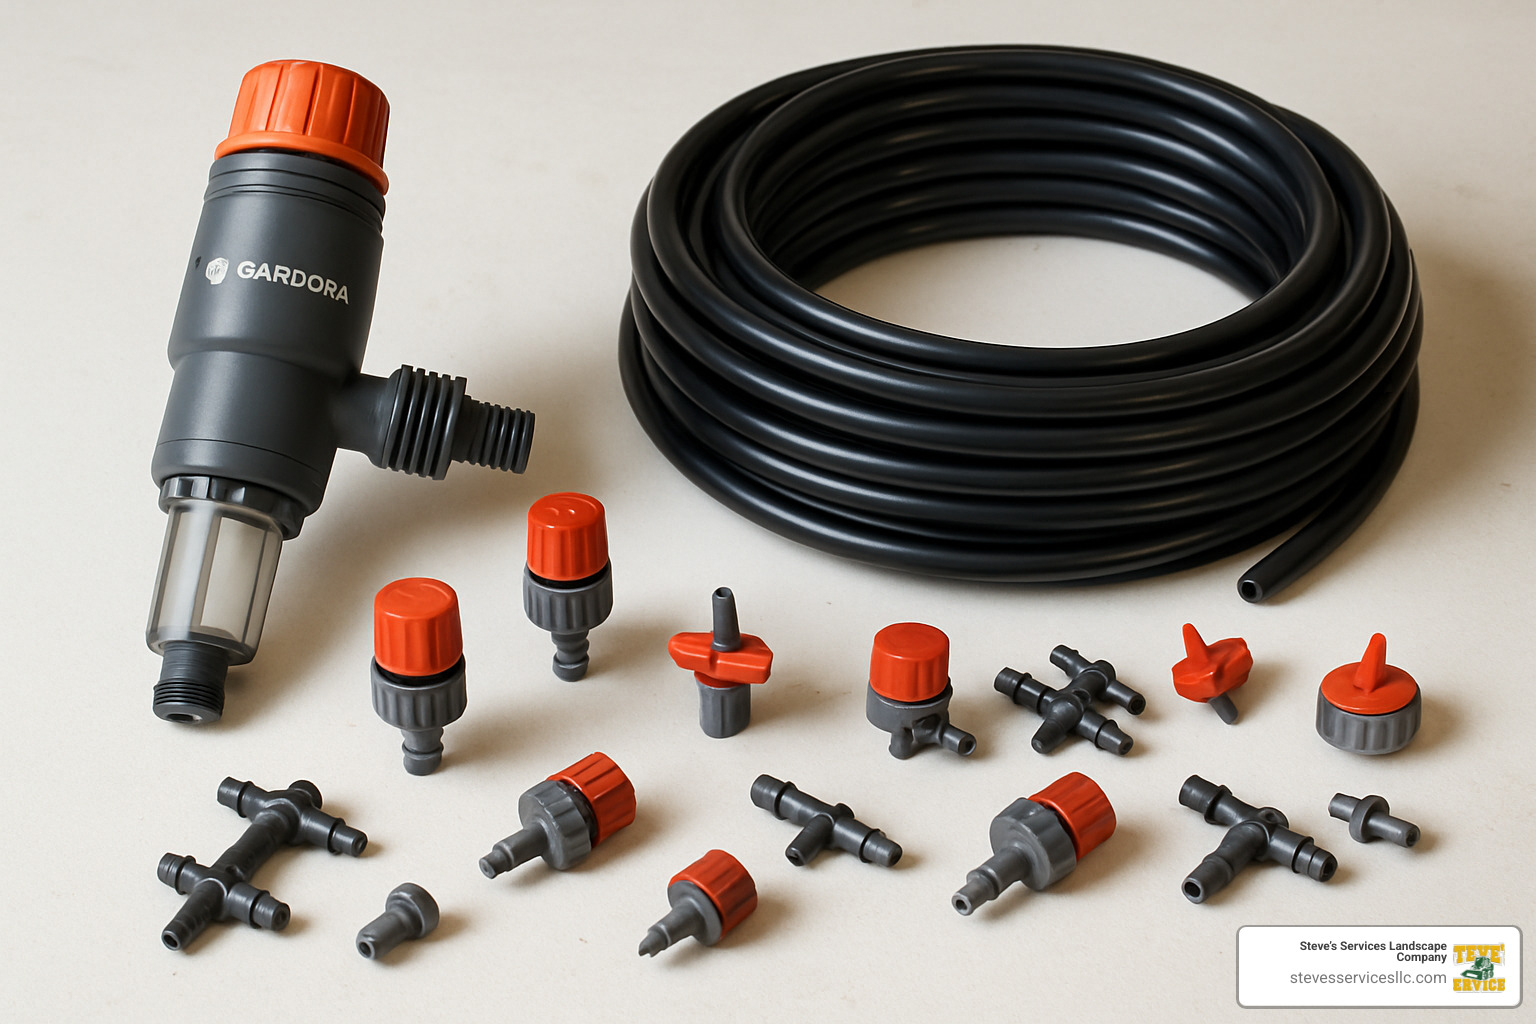
When I first installed a Gardena micro drip winter system for a client in Everett, they were amazed at how something so simple could be so effective. At its heart, this clever system starts with a pressure reducer that takes your standard household water pressure and brings it down to the perfect level for gentle drip irrigation—typically handling about 1,000 liters per hour. Working alongside this is an integrated filter unit that catches debris before it can cause trouble in those tiny emitters.
What makes this system truly special is its precision. Water travels through main supply lines and into smaller distribution tubing, eventually reaching adjustable drippers that deliver moisture right where plants need it most—at their roots. This targeted approach is why you’ll save up to 70% of water compared to traditional watering methods. That’s not just good for your wallet; it’s wonderful for conservation efforts across Massachusetts.
I love showing clients Gardena’s “Quick & Easy” connection technology—it’s genuinely user-friendly. You don’t need to be a plumbing expert or have specialized tools to set it up. Simply cut the tubing to your desired length, pop in the connectors, and you’re ready to water. Even my most technically challenged customers in Melrose and Burlington have mastered it quickly!
More info about irrigation systems
Key Components & Flow Path
The starting module is where the magic begins—combining both the pressure reducer and filter into one efficient unit. This little powerhouse handles approximately 1,000 liters per hour, making it versatile enough for gardens of all sizes throughout our service areas like Everett, Burlington, and Melrose.
From there, water flows through the main distribution lines (typically 13mm or ½ inch tubing) before branching into smaller 4.6mm supply lines that feed individual plants or rows. Along these pathways, you’ll find several key components working together:
Inline emitters sit directly within the tubing at regular intervals, perfect for row plantings or hedges. Endline drippers can be adjusted to deliver anywhere from a trickle to 10 liters per hour, giving you complete control over moisture levels. For broader coverage, spray nozzles disperse water gently over small areas, while endline plugs cap off unused connections to prevent leaks.
What I appreciate most about this system is its scalability. Many of my Winchester clients start with just a few containers, then expand as their gardening confidence grows. Meanwhile, my established customers in Wakefield often have elaborate setups covering their entire landscape.
Benefits for Overwintering Plants
While many of us think irrigation systems are just for summer, the Gardena micro drip winter setup offers unique advantages for plants needing occasional moisture during dormancy.
Reduced evaporation is a major benefit during those dry winter periods we sometimes experience in Massachusetts. By delivering water directly to the soil, precious moisture stays where it’s needed instead of evaporating into the air. This is especially important for newly planted trees and shrubs that haven’t established deep root systems yet.
Your evergreens will thank you for the minimal leaf wetting this system provides. Unlike overhead watering, drip irrigation keeps foliage dry, dramatically reducing the risk of fungal diseases that often plague winter gardens. I’ve seen this make a real difference for clients in Stoneham and Saugus who cherish their ornamental plantings.
Plants in protected areas or cold frames benefit from the consistent moisture the system delivers. Rather than shocking dormant plants with sudden drenching, the gentle sipping action helps maintain soil health throughout winter. This has proven particularly valuable for winter vegetable gardens and container plantings across North Reading and Reading.
Perhaps most importantly, proper hydration through winter helps maintain plants’ natural disease prevention capabilities. I’ve observed that perennials receiving appropriate winter moisture show stronger spring growth and fewer problems with pathogens when the growing season returns.
When properly winterized (which we’ll cover in detail), this versatile system protects your investment while providing options for those plants that need occasional winter watering. It’s just one more way the Gardena micro drip winter approach helps your garden thrive year-round.
Why Winter Changes Everything for Drip Irrigation
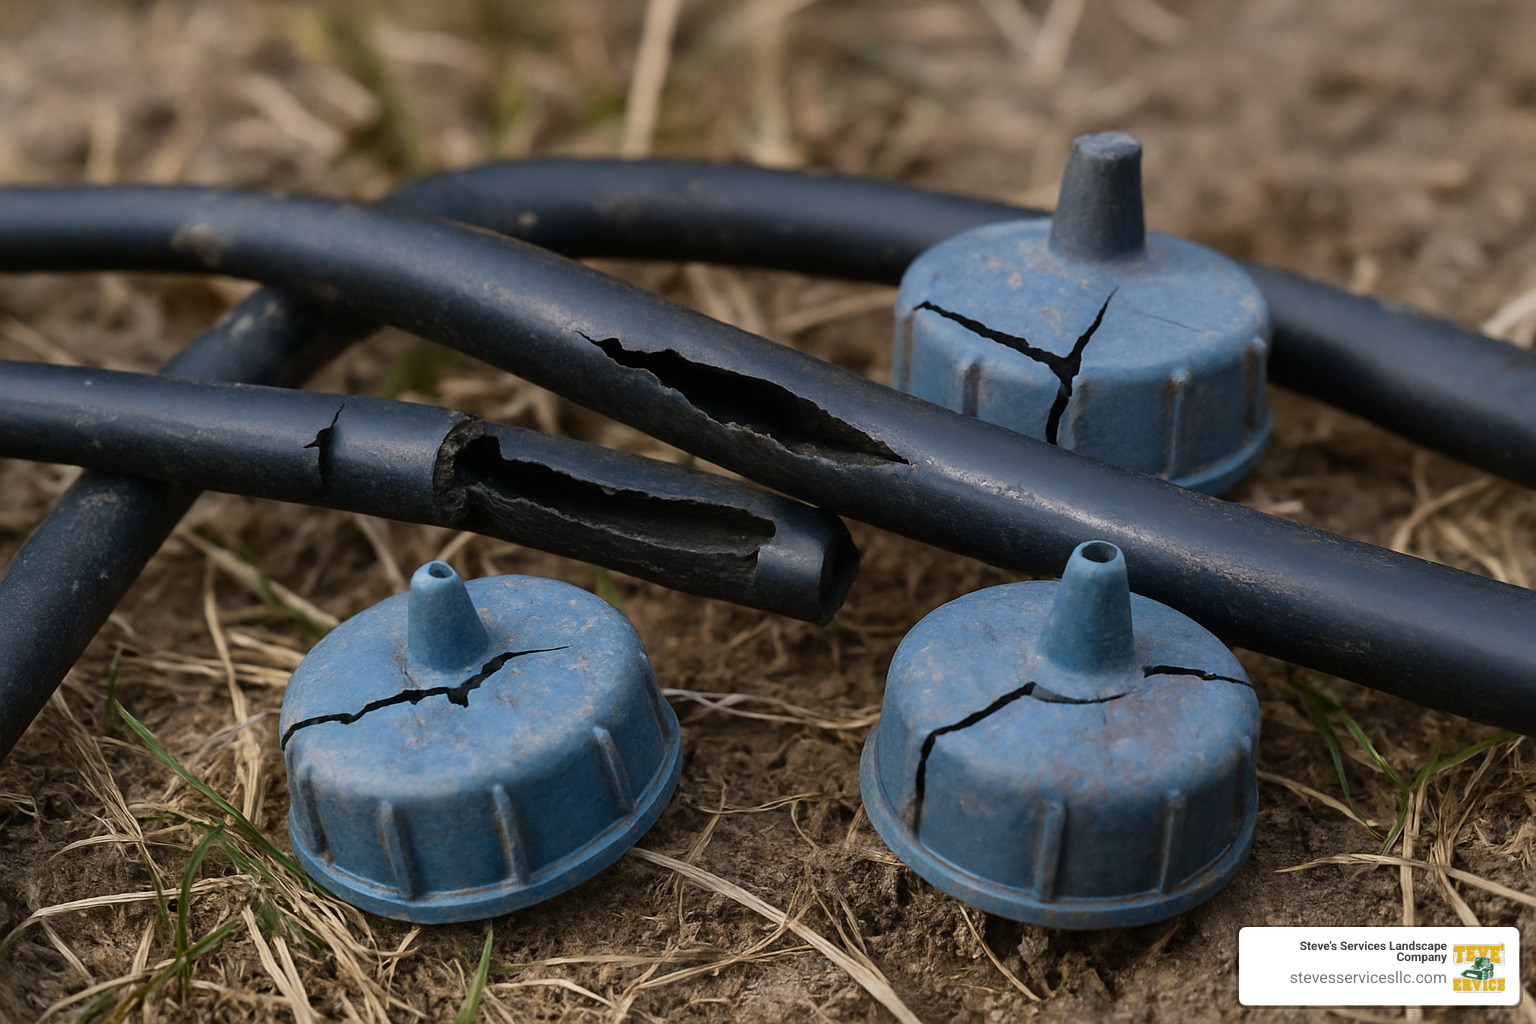
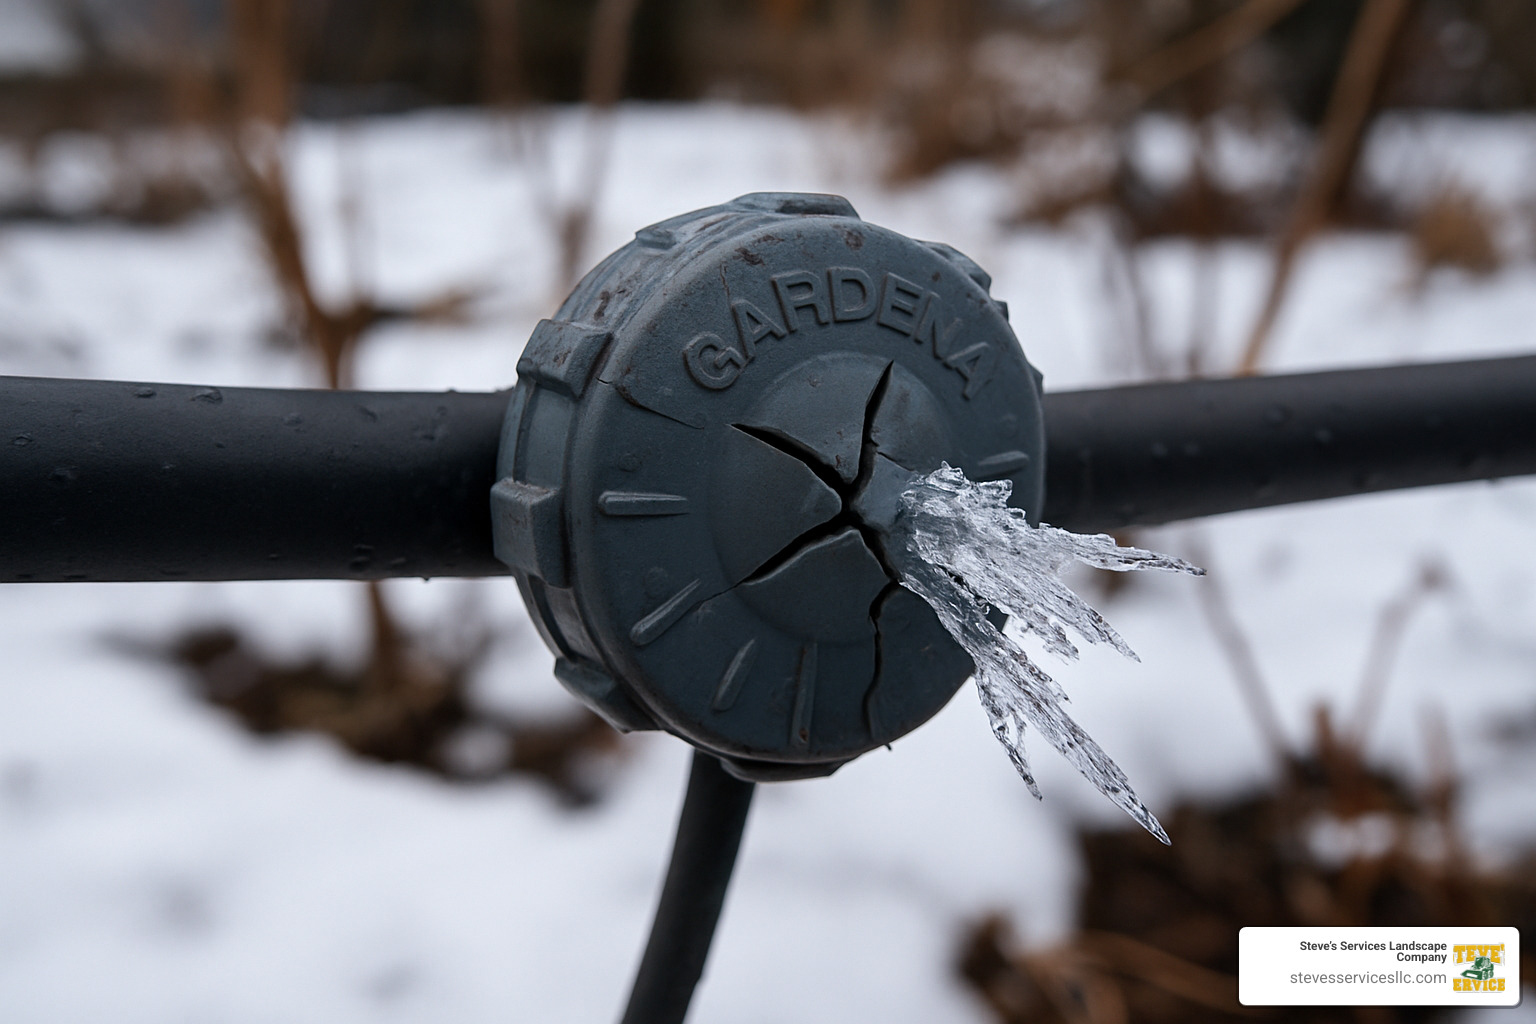
Winter in Massachusetts doesn’t just change how we dress—it completely transforms how we need to think about irrigation. When temperatures plummet, water’s unique property of expanding as it freezes (by about 9%) creates forces strong enough to crack even the toughest materials in your Gardena micro drip winter system.
This expansion isn’t just a minor concern—it’s the number one enemy of your irrigation investment. Any component where water gets trapped becomes vulnerable, from tiny emitters to main distribution lines. The most frustrating part? You might not even notice the damage until spring, when you eagerly turn on your system only to find leaks, pressure problems, or components that simply don’t work anymore.
The winter soil environment changes everything too. Wet soil conducts cold more efficiently than dry soil, potentially creating ice around your precious plant roots. Meanwhile, your dormant plants are essentially hibernating, needing far less water than during the growing season. Ironically, giving them too much water during winter can actually stress them more than helping them!
Your system’s valves deserve special attention—they’re particularly vulnerable with their multiple chambers and diaphragms where water hides and freezes. And if you have a pump system? That needs even more care, as frozen water can crack expensive casings or damage impellers, leading to costly replacements.
Frost Threatens – How to Protect Gardens
Water Requirements in Cold Months
Your plants’ thirst changes dramatically when winter arrives. Here in Massachusetts, understanding these shifting needs saves both your plants and your water bill:
Most dormant plants only need watering every 3-4 weeks during winter, if at all—quite a change from summer’s multiple weekly waterings. When you do water, think “shallow sips” rather than deep drenches to prevent soil from becoming waterlogged.
Always check soil moisture before watering. If the ground is frozen or already damp, skip irrigation entirely. Your plants will thank you. And timing matters—water only during the warmest part of the day, giving moisture time to be absorbed before overnight freezing temperatures return.
For our clients in colder areas like North Reading and Burlington, we’ve found success by only watering when temperatures will remain above freezing for at least 24 hours. This prevents those dangerous ice lenses from forming around root zones, which can damage even well-established plants.
Risks of Leaving Systems Active
I’ve seen the consequences of neglected Gardena micro drip winter preparations firsthand, and they’re never pretty. Leaving your system active without proper winterization invites several expensive problems:
Your system’s flexible tubing—so versatile during growing seasons—becomes brittle in freezing temperatures. When water inside freezes and expands, these hoses often split or crack completely. Control valves suffer a similar fate, with water trapped in bonnets and diaphragms expanding and cracking these precision components.
Those carefully calibrated emitters? Ice expansion can permanently damage their internal mechanisms, leaving them either completely blocked or inconsistently dripping come springtime. And here’s something many gardeners don’t realize: most manufacturers, including Gardena, specifically exclude freeze damage from warranty coverage.
Throughout my years serving Lynnfield and Melrose properties, I’ve seen countless systems requiring complete replacement simply because owners skipped proper winterization. The small investment of time to prepare your system for winter pays enormous dividends in avoiding these costly headaches.
Gardena Micro Drip Winter Prep Checklist — Step-By-Step Shield Against Frost
When Massachusetts temperatures start dropping, it’s time to protect your garden’s lifeline from the coming freeze. I’ve helped hundreds of homeowners throughout Everett and surrounding communities shield their irrigation investments, and this tried-and-true Gardena micro drip winter checklist will keep your system safe until spring.
Start with a simple planning calendar that works with our New England seasons. In early fall, take a walk through your garden and inspect your system for any repairs needed before winter sets in. By mid-fall, gradually reduce your watering frequency—this not only saves water but helps prepare your plants for their dormant period. About 2-3 weeks before your area’s typical first frost, gather all your winterization supplies. Your deadline is firm: complete all winterization before overnight temperatures drop below 32°F. Mother Nature won’t wait, and neither should you!
Your shut-off strategy begins with turning off the water supply at the main valve—this is your first defense against freeze damage. Next, disconnect the Gardena starting module from your water source, and if you’re using automatic timers, remove batteries or disconnect power. I always recommend setting timers to “Off” or “Rain” mode rather than unprogramming them completely—this preserves your carefully calibrated schedule for spring.
For drainage, you have two reliable options. A gravity drain works well for most home systems—simply open all end caps and drain valves, allowing water to flow out naturally. For more thorough protection, especially in our colder Massachusetts communities like Woburn, a compressed-air blow-out provides peace of mind. Just remember to keep the pressure low (never exceed 50 PSI) to avoid damaging those delicate emitters.
Winterize Your Drip Irrigation System
More info about how to blow out a system
Drain & Dry — The “No-Ice” Rule for Gardena Micro Drip Winter
The golden rule of Gardena micro drip winter preparation is beautifully simple: no water means no ice damage. I’ve seen too many springtime repair calls that could have been avoided with proper drainage.
Start by opening all end caps at the farthest points of your system. This gives water an escape route as you work. Then, beginning from your water source, systematically lift each section of tubing—think of it as creating a wave that pushes water toward those open ends. For systems with automatic solenoid valves, locate the manual bleed lever (usually a small thumb screw or lever on top) and open it to release any trapped water.
Don’t forget to unscrew and empty the filter bowl on your starting module. Here’s a pro tip from years of experience: leave it partially unscrewed throughout winter to prevent damage to the rubber seals as temperatures fluctuate. Finally, disconnect all supply hoses from your water source and hang them with both ends down to ensure complete drainage.
For my clients in Winchester and other areas with particularly harsh winters, I always recommend repeating this drainage process twice. That extra ten minutes of effort can save hundreds in spring repairs.
Store & Insulate — Small Parts, Big Savings for Gardena Micro Drip Winter
The small components of your system often represent the biggest vulnerability—and the biggest potential savings—in your Gardena micro drip winter preparation.
Your pressure reducer deserves special attention—this component is particularly susceptible to freeze damage and costly to replace. Disconnect it completely from the water source, drain it thoroughly, and store it in a frost-free location like your basement or heated garage. While you’re at it, collect all your endline drippers, spray nozzles, and connectors in a clearly labeled container and bring them indoors too.
For distribution manifolds that must brave the outdoors, wrap them thoroughly with foam pipe insulation and secure with waterproof tape. Any sections of tubing that can’t be removed should be protected with pre-slit foam insulation sleeves, paying extra attention to low points where water might collect.
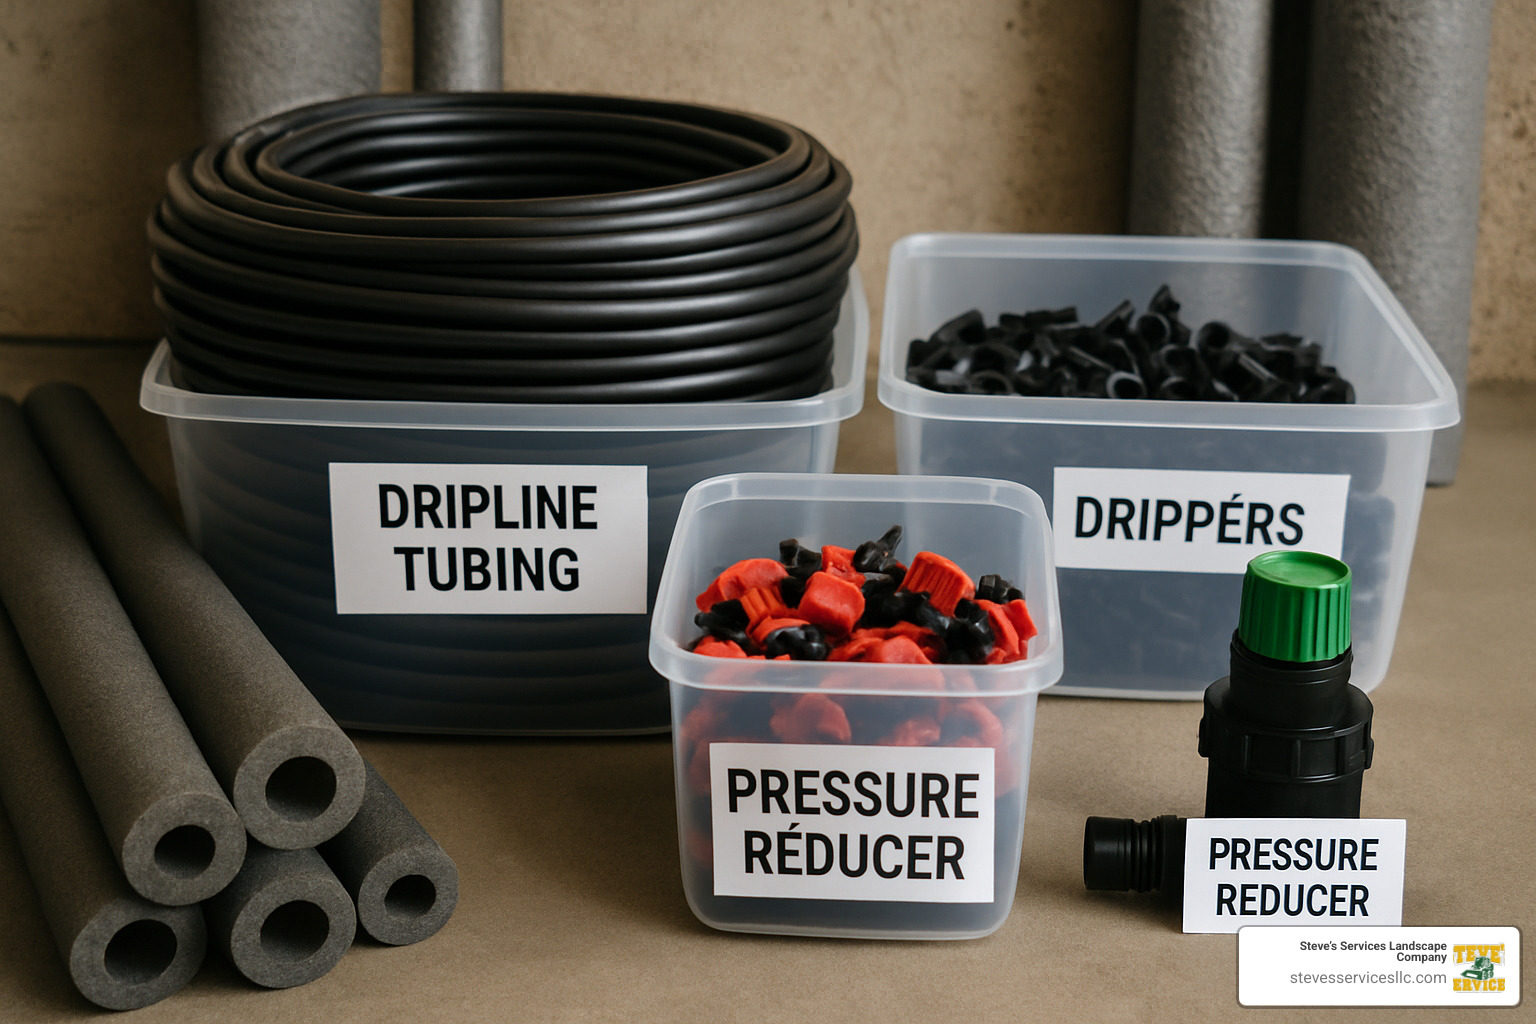
Before you disassemble everything, I always recommend taking a few quick photos with your phone—this simple step has saved countless Revere and Saugus homeowners from springtime confusion when it’s time to put everything back together.
Protect Valves, Pumps & Backflow Devices
The more complex components of your irrigation system need extra care during Gardena micro drip winter preparation.
For valves, start by operating those manual bleed levers to release water from the chambers inside. Then slightly loosen the valve bonnets—don’t remove them completely, just give them enough slack to relieve pressure and allow for any expansion. With gate and ball valves, leave them in a half-open position to prevent water from getting trapped in the mechanism itself.
If your system includes a pump, open the lowest drain plug on the housing and remove the suction line completely. Once everything’s drained, cover any open pipes to keep debris and curious critters out during winter months.
Backflow preventers are not just essential safety devices—they’re also particularly vulnerable to freeze damage. If possible, remove yours completely and store it indoors for winter. If removal isn’t an option, drain it thoroughly and wrap it with several layers of insulation.
More info about frozen backflow valves
Taking these steps might seem like a lot of work on a chilly fall afternoon, but I’ve seen the alternative first-hand across Massachusetts communities from Everett to Reading—springtime repairs that could have been avoided with a single afternoon of preventative care. Your future self (and wallet) will thank you when gardening season returns!
Troubleshooting & Mid-Winter Maintenance
Even with careful winterization, Mother Nature can throw a few curveballs your way during the cold months. As someone who’s helped countless Massachusetts homeowners through winter irrigation challenges, I’ve found that a few simple checks can prevent major headaches.
Take a quick walk around your property after significant temperature swings or heavy snowstorms. Look for any exposed parts of your Gardena micro drip winter system that might have become uncovered. In our Stoneham and Lynnfield properties, we often find evidence of curious rodents who love to chew on irrigation tubing or pull away protective insulation – they seem to think we installed it just for their nesting materials!
If you find a frozen section of your system (it happens to the best of us), resist the urge to apply direct heat from a torch or heat gun. This can cause more damage than the ice itself! Instead, use warm (not hot) water or a hair dryer on its lowest setting, allowing components to thaw gradually. Quick temperature changes can create cracks in plastic components just as easily as freezing can.
For unexpected mid-winter repairs, I recommend keeping a small emergency kit with repair couplings and spare tubing sections. Just remember to use only compatible Gardena parts, and wait for temperatures to rise above freezing before attempting any fixes. Working with brittle, cold plastic often leads to additional breaks.
More info about irrigation system repair
Common Winter Problems & Prevention
After serving Massachusetts communities through countless winters, I’ve encountered several recurring issues with irrigation systems. Here’s what to watch for and how to prevent these problems:
Ice blockage can form inside tubing even with careful preparation, completely stopping water flow when you need your system. The best defense is thorough drainage before freezing temperatures arrive and using compressed air to clear those stubborn water droplets from lines.
When water freezes and expands inside your system, it often forces emitter pop-offs – those little drippers literally get pushed right out of their fittings by ice pressure. This is why we’re so adamant about removing and storing these components indoors when possible.
Something many homeowners don’t consider is vacuum draw. When draining your system, the outflowing water can create a vacuum that might collapse tubing or even pull contaminants into the system through tiny openings. Prevent this by opening multiple points in your system during drainage to allow air entry.
Finally, algae buildup loves to form in stagnant water left in your system over winter. By spring, these microscopic invaders can clog your emitters and create frustrating blockages. A thorough system flush and clean filter before winterization will help avoid this issue.
Using the System in Greenhouses or Mild Climates
Not everyone needs to completely shut down their Gardena micro drip winter system. For greenhouse applications or during those surprisingly mild winter stretches we sometimes get in Massachusetts, your irrigation can still be valuable with a few adjustments.
The golden rule for winter operation is to only run your system when temperatures are consistently above 40°F. Schedule any watering during the warmest part of the day – typically between 10am and 2pm – and keep cycles short to prevent water standing in lines overnight where it might freeze.
Your timer settings need winter adjustments too. Plants require significantly less water in winter, so reduce frequency accordingly. I always recommend programming watering to occur mid-day rather than early morning or evening when temperatures drop. For truly unpredictable weather periods, consider switching to manual operation rather than risking an automated cycle during an unexpected freeze.
For my clients in Malden and Wakefield with greenhouse setups, I often suggest Gardena’s solar-powered AquaBloom system as a winter alternative. This clever device can maintain up to 20 plants without connection to a water tap, making it perfect for winter use in protected environments where your main system has been winterized. The solar operation means no electricity costs, and its self-contained nature eliminates freeze concerns for your primary irrigation infrastructure.
Restarting in Spring & Average Cost Considerations
As Massachusetts awakens from winter’s grip, your carefully winterized Gardena system deserves a thoughtful reawakening too. After serving countless clients from Wakefield to Winchester, I’ve found that a methodical approach to spring startup prevents headaches and ensures your plants receive the perfect moisture they need.
Begin your system revival by reconnecting the pressure reducer and filter to your water source—these vital components are the heart of your Gardena micro drip winter protection strategy. Next, reattach your main distribution lines, replace all emitters and endline plugs, and reinstall any components you wisely stored indoors during the cold months.
Before fully pressurizing your system, remove those endline plugs and turn on the water at low pressure. This gentle flush pushes out any debris that might have found its way into your lines during winter. It’s a bit like clearing your throat before speaking—giving your system a chance to clear out before the main performance begins.
While the water flows, take a slow walk around your garden, checking each connection point for leaks. Pay special attention to any fittings that were exposed to winter’s worst. Once you’re satisfied everything is secure, replace those endline plugs and inspect each emitter for proper function. Only then should you gradually increase to normal operating pressure.
With your hardware running smoothly, it’s time to address the brains of the operation. Reset your timers to appropriate spring watering schedules, which typically require more frequent but shorter watering cycles than summer. Adjust your emitter flow rates to match spring plant needs—remember, they’re just waking up and don’t need a deluge quite yet. A quick check of soil moisture levels will help establish your baseline conditions for the season.
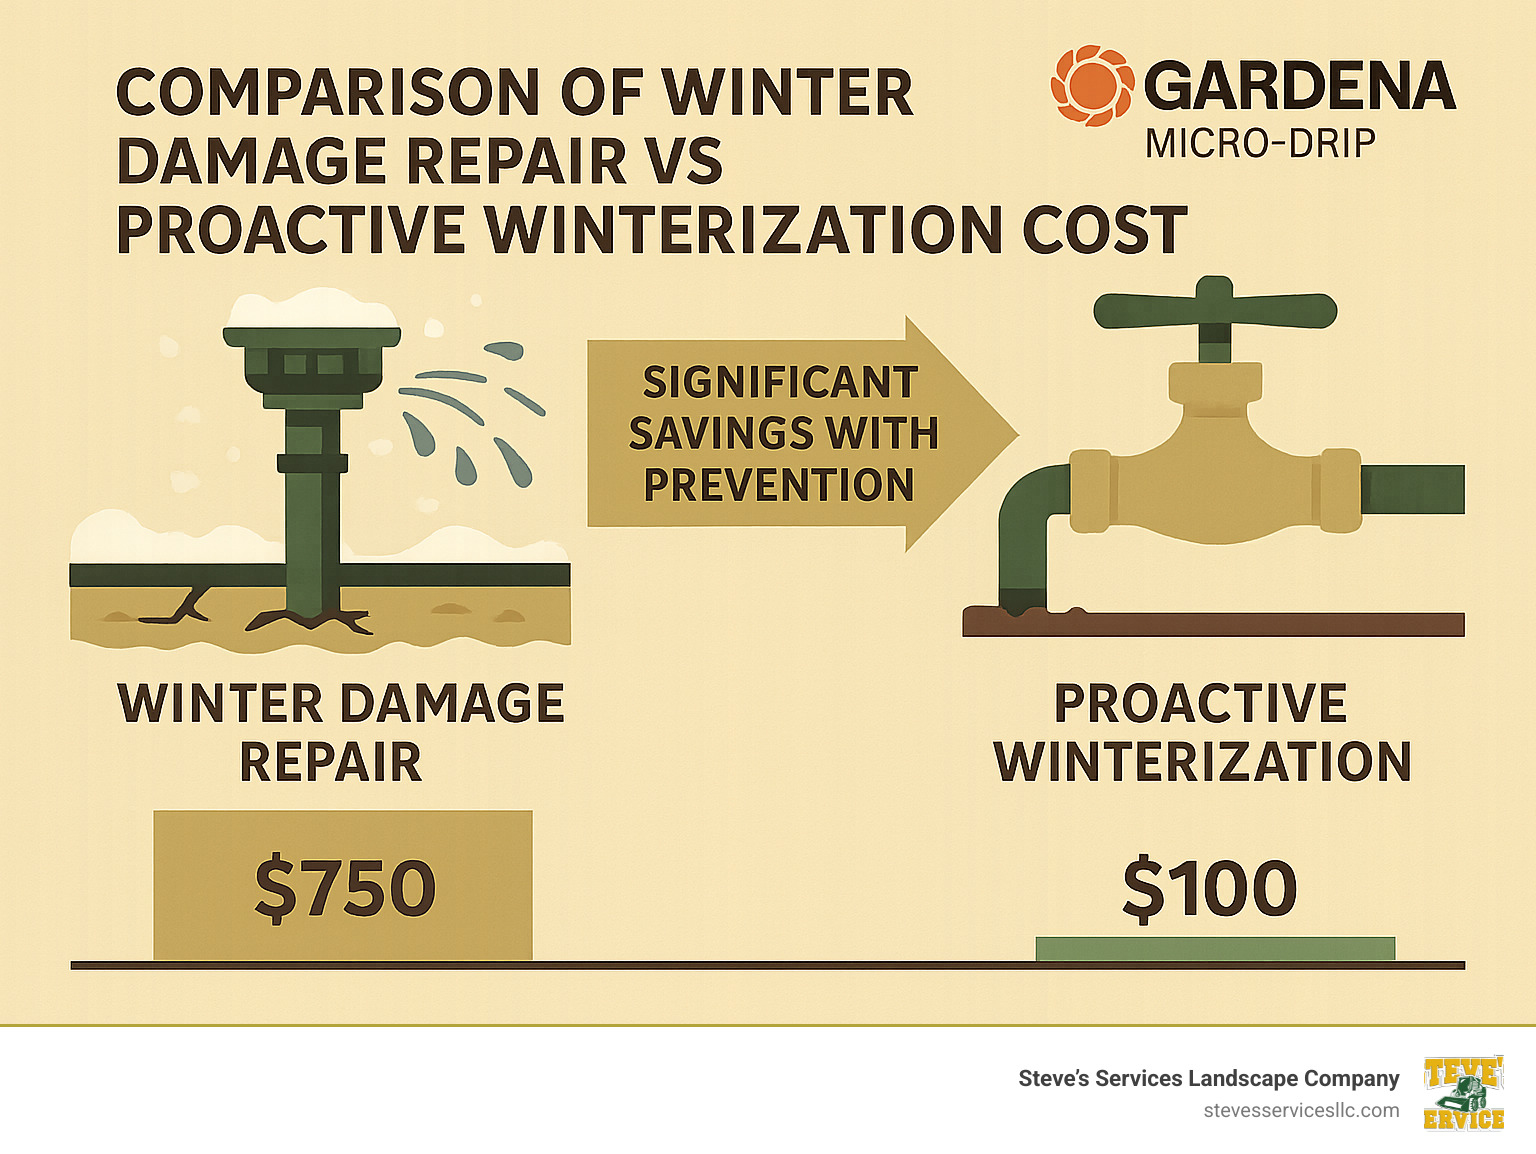
The financial wisdom of proper Gardena micro drip winter preparation becomes crystal clear when comparing prevention costs to repair expenses. Based on internet data (not actual costs for Steve’s Services), freeze damage repairs typically range from:
- Minor repairs involving a few emitters and small sections of tubing: $50-$150
- Moderate repairs including multiple components and valve damage: $150-$450
- Major repairs or partial system replacement: $450-$900
- Complete system replacement: $900-$2,700
Best Practices for a Smooth Start
After decades of helping homeowners across Burlington, Danvers, and Everett resurrect their irrigation systems each spring, I’ve developed some tried-and-true practices that ensure a trouble-free transition.
Slow pressurization is perhaps the most important step—open your water supply valve gradually over 30-60 seconds rather than all at once. This gentle approach prevents water hammer (that alarming banging sound in pipes) that can damage freshly reconnected components and undo all your careful Gardena micro drip winter preparation.
While your system runs, conduct a thorough leak inspection. I recommend getting down to garden level and examining each connection point with careful eyes. Those tiny drips can become major problems if ignored. Don’t forget to check for mysterious wet spots in soil that might indicate underground leaks in buried supply lines.
Spring is the perfect time for a seasonal filter change. Either replace or thoroughly clean the filter element in your starting module—you’d be surprised at what can accumulate during the off-season. A clean filter ensures proper flow and protects those precision emitters from clogging.
Many of our Everett and Melrose clients also use spring startup as an opportunity to consider thoughtful system upgrades. Water-efficient emitter replacements can further reduce your water usage, while smart timer integration provides weather-based control that adjusts automatically to rainfall and temperature. If you’ve added new planting areas over winter, spring is also the ideal time for system extensions to ensure those new additions receive proper irrigation.
More info about irrigation system upgrades
Frequently Asked Questions about Winterizing Micro-Drip Systems
How often should I water evergreen containers in freezing weather?
Winter watering for evergreen containers requires a delicate balance here in Massachusetts. While your plants still need moisture, their requirements change dramatically with the season. I typically advise my clients to check soil moisture weekly by simply inserting a finger 1-2 inches below the surface. If it feels dry at that depth, it’s time for a drink—but only when temperatures are above freezing.
Most container evergreens need watering just every 3-4 weeks during winter months. Always water during the warmest part of the day, giving moisture time to absorb before evening temperatures plummet. This prevents the freeze-thaw cycle that can be so damaging to plant roots.
If you’re keeping your Gardena micro drip winter system available for occasional use, I strongly recommend operating it manually rather than on a timer. After each use, take the time to drain lines completely. In winter, slightly underwatering is generally safer than overwatering, as excess moisture that freezes around roots can cause significant damage to even established plants.
Can I run my Gardena drip line under mulch all winter?
Many of my clients ask about leaving drip lines under protective mulch through winter. While mulch provides wonderful insulation for your plants, it won’t adequately protect your irrigation components from Massachusetts freeze-thaw cycles. I don’t recommend keeping active drip lines under mulch throughout winter—the risk simply outweighs the convenience.
If you prefer leaving the lines in place (but not running) beneath mulch for easier spring setup, be aware of several considerations. First, you absolutely must drain them completely. Second, mulched areas become cozy winter homes for rodents that may decide your irrigation tubing makes perfect nesting material. I’ve seen entire systems damaged by mice and voles seeking shelter! Finally, spring inspection becomes more challenging when lines aren’t readily visible.
For my clients in colder microclimates like North Reading, I typically recommend removing at least the above-ground components rather than relying solely on mulch protection. The small effort of proper Gardena micro drip winter preparation saves significant headaches and expenses when spring arrives.
What PSI is safe after re-pressurizing in spring?
When awakening your Gardena micro drip winter system from its seasonal slumber, gentle pressure is the key to success. Begin with very low pressure—around 10 PSI if possible—and watch carefully as you gradually increase to normal operating levels. The Gardena Micro-Drip-System is specifically designed to work with reduced pressure, typically around 15-25 PSI after passing through the pressure reducer.
I always caution against exceeding 30 PSI on any drip components. Higher pressure can force apart connections and damage emitters, especially if they’ve experienced even minor winter stress or UV degradation. This is particularly important during that first spring restart.
If your system includes a pressure gauge, use it to monitor the restart process. If not, open the valve very gradually (about 1/4 turn) and take a slow walk along your lines, inspecting for leaks or spray before increasing pressure further. This patient approach has saved countless clients from the frustration of hunting down multiple leaks or replacing damaged components.
Your irrigation system is an investment in your landscape’s health—taking these few extra minutes during spring startup helps ensure it continues performing beautifully throughout the growing season.
Conclusion
Winter in Massachusetts can be tough on garden equipment, but with proper Gardena micro drip winter preparations, your irrigation system will be ready to perform beautifully when spring arrives. Think of winterization as preventive medicine for your garden’s lifeline—a small investment of time now that prevents major headaches later.
The steps we’ve outlined aren’t just suggestions—they’re essential protections that save our clients hundreds or even thousands in potential repair costs every year. There’s nothing more frustrating than eagerly preparing for spring planting only to find cracked components and leaking connections in your irrigation system.
I’ve seen the difference proper winterization makes firsthand. Last year, one of our Wakefield clients skipped their usual fall preparation due to travel plans. When they returned in spring, they faced nearly $600 in repairs for damaged emitters, cracked supply lines, and a split pressure reducer—all preventable with about 30 minutes of winterization work.
Your Gardena system is an investment in your landscape’s health and your own convenience. Protecting that investment makes good sense, especially when the alternative could mean starting from scratch next season.
At Steve’s Services Landscape Company, we’ve been helping homeowners and businesses throughout Everett, Malden, Wakefield, and surrounding communities protect their irrigation investments for decades. Our team understands the unique challenges New England winters bring to landscape systems, and we’re always ready with personalized solutions custom to your property’s specific needs.
Whether you’d prefer professional winterization service, need help with spring restart, or simply want an expert evaluation of your current setup, we’re here to help with the same friendly, knowledgeable service that’s made us a trusted name in local landscaping.
More info about complete irrigation solutions
Don’t let winter catch your garden unprepared. A little attention now means worry-free gardening when the warm weather returns. Contact Steve’s Services Landscape Company today—we’re your local experts in Everett for irrigation peace of mind through every season.
